
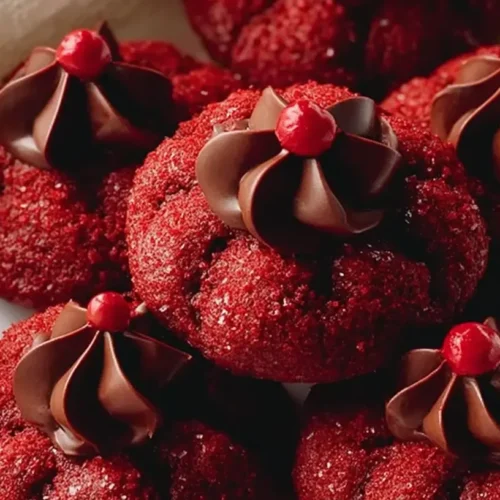
The first time I bit into a Hershey’s Red Velvet Blossom, I understood immediately why calling them “addictive” felt like an understatement. That soft, tender red velvet cookie, with its subtle cocoa notes and vibrant hue, perfectly complemented by the iconic milk chocolate kiss nestled in the center – pure cookie magic! It’s the kind of treat that stops conversations, elicits happy sighs, and, yes, has you reaching for a second, then a third, before you even realize what’s happening. If you’re looking for a dessert that’s not just delicious but genuinely charming and universally loved, you’ve found your next baking project.
Why You’ll Love This Dish
These aren’t just any cookies; Hershey’s Red Velvet Blossoms are a celebration in every bite. They effortlessly combine a classic cake flavor with the irresistible charm of a blossom cookie, making them a standout. Perfect for holiday cookie platters, a cozy night in, or as a delightful potluck contribution, they truly shine. They’re quick enough for a weeknight craving but impressive enough for a special occasion. Plus, that striking red color makes them visually stunning – imagine a plate of these on your festive table!
> “I made these for a work potluck, and they were gone before anything else! Everyone kept asking for the recipe. The texture is perfect, and the chocolate kiss in the middle is just genius.” — A happy baker
The Cooking Process Explained
Making Hershey’s Red Velvet Blossoms is a delightful journey that feels a lot more complex than it actually is. You’ll start by creaming together butter and sugar until it’s light and fluffy, then incorporating an egg, a touch of vanilla, and that crucial red food coloring to get that signature hue. Next comes the dry ingredients – flour, cocoa powder for depth, baking soda, and a pinch of salt – all mixed together until just combined. The dough gets a quick chill to make it easier to handle, then it’s rolled into small balls and coated in granulated sugar for that extra sparkle and delicious crackle. A quick bake, and right out of the oven, each warm cookie gets a Hershey’s Kiss gently pressed into its center, melting slightly and creating that iconic blossom shape.
Key Ingredients
Here’s what you’ll need to gather to create these irresistible cookies:
- All-purpose flour: The foundation of our cookie.
- Unsweetened cocoa powder: Just a touch to give that classic red velvet flavor. Don’t skip it!
- Baking soda: Our leavening agent for a soft, tender crumb.
- Salt: Balances the sweetness and enhances flavor.
- Unsalted butter: Make sure it’s softened to room temperature for proper creaming.
- Granulated sugar: For sweetness in the dough and for rolling the cookie balls.
- Light brown sugar: Adds a deeper molasses note and helps keep the cookies soft.
- Large egg: Binds everything together.
- Vanilla extract: Essential for enhancing all the other flavors.
- Red liquid or gel food coloring: This is what gives your cookies that iconic red velvet vibrancy. Gel coloring provides a richer color with less liquid.
- Hershey’s Kisses: Unwrap them ahead of time! You’ll need about 4 dozen. Milk chocolate is traditional, but feel free to experiment with others.
Directions to Follow
Let’s get baking!
- Prep Your Oven and Kisses: First, preheat your oven to 350°F (175°C). Line two baking sheets with parchment paper or silicone mats. Then, and this is crucial, unwrap all your Hershey’s Kisses and set them aside. Trust me, you don’t want to be fumbling with wrappers when the cookies are hot!
- Whisk Dry Ingredients: In a medium bowl, whisk together the all-purpose flour, cocoa powder, baking soda, and salt. Set this aside.
- Cream Wet Ingredients: In a large bowl, using an electric mixer, cream together the softened butter, granulated sugar, and light brown sugar until the mixture is light and fluffy, about 2-3 minutes. Beat in the egg, vanilla extract, and red food coloring until well combined and the color is uniform throughout.
- Combine Wet and Dry: Gradually add the dry ingredient mixture to the wet ingredients, mixing on low speed until just combined. Be careful not to overmix the dough.
- Chill (Optional, but Recommended): For easier handling, especially if your kitchen is warm, cover the dough and chill it in the refrigerator for about 15-30 minutes.
- Form and Roll: Place about 1/2 cup of granulated sugar in a shallow bowl. Scoop rounded tablespoons of dough and roll them into smooth balls. Roll each ball in the granulated sugar to coat evenly.
- Bake: Place the sugar-coated dough balls about 2 inches apart on your prepared baking sheets. Bake for 9-11 minutes, or until the edges are lightly set and the centers are still soft and slightly puffy. They might not look fully done, but they will firm up as they cool.
- Add the Kisses: Immediately upon removing the cookies from the oven, gently press one unwrapped Hershey’s Kiss into the center of each warm cookie. The chocolate will soften and melt slightly, forming the “blossom.”
- Cool: Let the cookies cool on the baking sheets for 5-10 minutes before transferring them to a wire rack to cool completely.
How to Serve Hershey’s Red Velvet Blossoms
These cookies are charming all on their own, but a beautiful presentation can elevate the experience even further. Arrange them artfully on a white platter to really make that vibrant red pop. They’re perfect alongside a cold glass of milk, a warm mug of coffee, or a rich hot chocolate for an indulgent treat. For a holiday spread, mix them with other festive cookies like gingerbread snaps or sugar cookies for a colorful assortment. You could even dust them lightly with powdered sugar right before serving for an extra touch of elegance, though the sugar coating already provides a lovely shimmer.
Keeping Leftovers Fresh
Hershey’s Red Velvet Blossoms are best enjoyed within a few days of baking. Once completely cooled, store them in an airtight container at room temperature for up to 3-4 days. To keep the Hershey’s Kisses from melting together if stacked, you can place a piece of parchment paper between layers of cookies.
Freezing: You can also freeze these cookies! Once completely cooled, place them in a single layer on a baking sheet and freeze until firm. Then, transfer the frozen cookies to a freezer-safe bag or airtight container, separating layers with parchment paper. They’ll keep in the freezer for up to 2-3 months. Thaw at room temperature before serving.
Helpful Cooking Tips
- Room Temperature Ingredients: Ensure your butter and egg are at room temperature. This allows them to cream together properly, resulting in a smoother, more uniform dough and a better cookie texture.
- Don’t Overmix: Once you add the flour mixture, mix only until just combined. Overmixing develops the gluten in the flour, which can lead to tough cookies.
- Perfect Red Color: If you want a truly deep, vibrant red, opt for gel food coloring over liquid. You’ll use less and get a more intense color without altering the dough consistency too much.
- Chill the Dough: While not strictly mandatory if your kitchen is cool, chilling the dough for 15-30 minutes makes it much easier to handle and roll, and can help prevent the cookies from spreading too much.
- Timing the Kisses: Press the Hershey’s Kisses into the hot cookies as soon as they come out of the oven. This allows the residual heat to slightly melt the chocolate, making it adhere beautifully and creating that signature blossom effect. If you wait too long, the cookies will firm up, and the kisses won’t sit as nicely.
- Unwrap Kisses Ahead: This tip is worth repeating! Unwrap all those chocolates before you even start mixing. It saves you frantic unwrapping with hot cookies on the counter.
Creative Twists
While the classic Hershey’s Red Velvet Blossom is perfection, there are fun ways to play with this recipe:
- Chocolate Swap: Instead of traditional milk chocolate Kisses, try dark chocolate Kisses for a richer, less sweet flavor, or even white chocolate Kisses for a different visual and taste contrast.
- Spice It Up: Add a tiny pinch of cinnamon or a dash of almond extract to the dough along with the vanilla for a subtle flavor twist.
- Gourmet Topping: Before pressing the Kisses, you could sprinkle a tiny bit of flaky sea salt on top of the cookie dough balls (before baking, but after rolling in sugar) for a contrasting salty-sweet note.
- Mini Kisses: For smaller, bite-sized cookies, consider using mini Hershey’s Kisses or chocolate chips pressed into mini cookie balls. Adjust baking time accordingly.
- Cream Cheese Frosting Swirl: For an even more intense red velvet experience, let the cookies cool and then, very carefully, pipe a tiny dot or swirl of cream cheese frosting around the base of the chocolate kiss.
FAQ
Q1: Can I make the dough ahead of time?
A1: Yes! You can prepare the cookie dough, wrap it tightly in plastic wrap, and refrigerate it for up to 2 days. When you’re ready to bake, let it sit at room temperature for about 15-20 minutes to soften slightly before rolling, then proceed with the recipe as directed.
Q2: Why did my cookies spread too much?
A2: Several factors can cause cookies to spread. Your butter might have been too warm or softened too much. Not chilling the dough (if your recipe calls for it or if your kitchen is warm) can also contribute. Make sure your oven temperature is accurate; too low an oven can also cause spreading. If all else fails, a little extra flour (a tablespoon or two) can help firm up the dough.
Q3: What if I don’t have red food coloring? Can I still make these?
A3: You can! They’ll still be delicious and have that lovely cocoa flavor, but they won’t have the signature red velvet appearance. They’ll look more like a regular chocolate cookie blossom. The red color is purely aesthetic for this recipe.
Classic Hershey’s Red Velvet Blossoms
Equipment
- Oven
- Baking sheets
- Parchment paper or silicone baking mats
- Medium bowl
- Large bowl
- Electric mixer
- Shallow bowl
- Wire rack
Ingredients
Dry Ingredients
- 1 ½ cups all-purpose flour
- ¼ cup unsweetened cocoa powder
- 1 teaspoon baking soda
- ½ teaspoon salt
Wet Ingredients
- ½ cup unsalted butter softened
- ½ cup granulated sugar for dough
- ¼ cup brown sugar packed
- 1 large egg
- 1 teaspoon vanilla extract
- 2 teaspoons red food coloring gel recommended
- 1 tablespoon milk
Finishing Touches
- ½ cup granulated sugar for rolling
- 36 Hershey’s Kisses unwrapped
Instructions
Preparation
- Preheat your oven to 375°F (190°C) and line baking sheets with parchment paper; unwrap all Hershey’s Kisses beforehand.
- In a medium bowl, whisk together the flour, cocoa powder, baking soda, and salt, then set aside.
Mixing the Dough
- Using an electric mixer in a large bowl, cream together the softened butter, granulated sugar, and brown sugar until light and fluffy for 2-3 minutes.
- Beat in the egg and vanilla extract, then add red food coloring and milk, mixing until the color is evenly distributed and smooth.
- Gradually add the dry ingredients to the wet, mixing on low speed until just combined, being careful not to overmix.
Baking
- Place granulated sugar in a shallow bowl; roll 1-inch cookie dough balls in the sugar until completely coated.
- Arrange sugared dough balls 2 inches apart on baking sheets; bake for 8-10 minutes until edges are set but centers are slightly soft.
- Immediately after baking, gently press a Hershey’s Kiss into the center of each warm cookie.
- Allow cookies to cool on the baking sheets for 5 minutes, then transfer to a wire rack to cool completely.