The first time I bit into a truly perfect fudgy red velvet brownie, it was an experience akin to finding a hidden treasure. That deep, rich cocoa layered with a subtle tang, all wrapped up in an incredibly moist and chewy square – it was divine. It perfectly captured the sophisticated allure of red velvet cake in a more approachable, intensely satisfying brownie form. This isn’t just another brownie recipe; it’s the recipe for those moments when you crave something truly special, something so good that just one piece leaves you utterly content.
Why You’ll Love This Dish
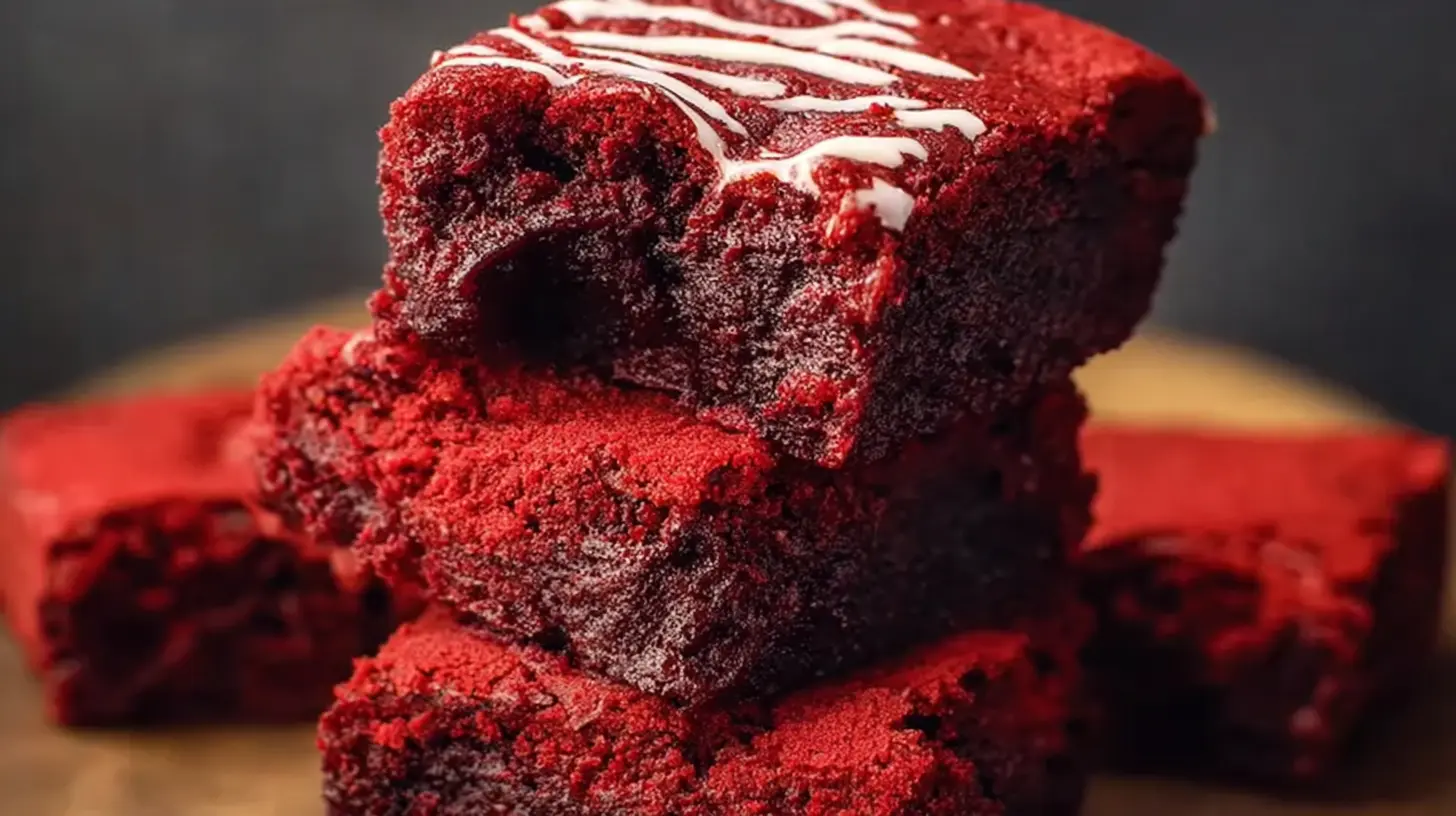
There’s something inherently luxurious about red velvet, and when translated into a brownie, it becomes an irresistible indulgence. You’ll adore these Fudgy Red Velvet Brownies because they hit all the right notes: they’re incredibly fudgy, boasting that signature vibrant red hue, and they deliver a delightful balance of chocolatey depth with a hint of tang from the buttermilk or vinegar. They’re not overly sweet, allowing the quality cocoa to shine through. Plus, they’re surprisingly straightforward to make, making them perfect for a special weekend treat, a holiday dessert, or even just to elevate a regular Tuesday evening. Each bite feels like a little celebration – rich, decadent, and utterly satisfying.
> “I made these for a family gathering, and they were the first dessert to disappear! Everyone raved about how fudgy and flavorful they were. The vibrant red color also made them a showstopper on the dessert table. Definitely a keeper!” – A Happy Baker
Preparing Fudgy Red Velvet Brownies
Making these spectacular brownies involves a few key steps that ensure that signature fudgy texture and stunning color. You’ll start by melting butter with your chocolate and cocoa powder, creating a rich base. Eggs and sugar are then whisked in, followed by the dry ingredients. The magic of the red velvet color comes from a touch of red food coloring and a tiny bit of vinegar or buttermilk, which also contributes to the tender crumb. The batter is then poured into a pan and baked until just set, ensuring that desirable gooey center.
Key Ingredients
To create these luscious Fudgy Red Velvet Brownies, gather these items:
- Unsalted Butter: Provides richness and helps achieve that fudgy texture.
- Granulated Sugar: Sweetens the brownies and contributes to their moistness.
- Large Eggs: Act as a binder and add to the fudginess.
- Vanilla Extract: Enhances the overall flavor profile.
- All-Purpose Flour: Provides structure without making the brownies cakey.
- Unsweetened Cocoa Powder: The chocolate component of our red velvet.
- Salt: Balances the sweetness and amplifies other flavors.
- Baking Powder: A tiny bit helps with a slight lift without drying them out.
- Red Food Coloring (gel is best): Essential for that iconic red velvet hue. Use a good quality gel for vibrant color without affecting texture.
- White Vinegar or Buttermilk: Reacts with the cocoa and food coloring, contributing to the red color and providing a subtle tang.
- Chocolate Chips or Chunks (optional): For an extra burst of chocolatey goodness.
Directions to Follow
Let’s get baking! Here’s how to whip up a batch of these irresistible brownies:
- Preheat & Prep: Preheat your oven to 350°F (175°C). Line a 9×13 inch baking pan with parchment paper, leaving an overhang on the sides to easily lift the brownies out later. Lightly grease the parchment.
- Melt Butter & Chocolate: In a heatproof bowl set over a saucepan of simmering water (or a microwave-safe bowl), melt the butter. Once melted, stir in the cocoa powder until smooth. Remove from heat and let it cool slightly.
- Combine Wet Ingredients: In a large bowl, whisk together the granulated sugar and eggs for about 2-3 minutes until pale and slightly thickened. Stir in the vanilla extract, red food coloring, and vinegar (or buttermilk).
- Add Chocolate Mixture: Gradually fold the cooled butter-cocoa mixture into the egg mixture until just combined.
- Fold in Dry Ingredients: In a separate medium bowl, whisk together the flour, salt, and baking powder. Gradually add the dry ingredients to the wet ingredients, mixing until just combined. Be careful not to overmix! If using, fold in the chocolate chips or chunks.
- Bake: Pour the batter evenly into your prepared baking pan. Bake for 25-30 minutes, or until a toothpick inserted into the center comes out with moist crumbs, but not wet batter. The edges should be set, and the center still slightly soft (this ensures fudginess!).
- Cool: Let the brownies cool completely in the pan on a wire rack before lifting them out using the parchment paper overhang. This is crucial for that perfect fudgy texture and clean slices.
How to Serve Fudgy Red Velvet Brownies
These Fudgy Red Velvet Brownies are fantastic all on their own, but a few flourishes can elevate them even further. For a classic touch, a dollop of cream cheese frosting (a quintessential red velvet pairing!) or a sprinkle of powdered sugar makes them look incredibly elegant. A scoop of vanilla bean ice cream creates a delightful warm-cold contrast, especially if the brownies are slightly warmed. For a simpler approach, a dusting of finely grated white chocolate or a drizzle of melted white chocolate adds visual appeal and another layer of flavor. They’re also splendid with a hot cup of coffee or a cold glass of milk.
Keeping Leftovers Fresh
Storing your Fudgy Red Velvet Brownies properly ensures they stay delicious and fudgy. Once completely cooled, cut the brownies into squares. Store them in an airtight container at room temperature for up to 3-4 days. To keep them extra moist, you can place a slice of bread in the container with them (the brownies will absorb moisture from the bread).
For longer storage, these brownies freeze beautifully. Wrap individual squares tightly in plastic wrap, then place them in a freezer-safe bag or container. They can be frozen for up to 2-3 months. Thaw at room temperature or gently warm in the microwave for a few seconds when you’re ready for a treat. Always ensure they are fully cooled before freezing to prevent ice crystals from forming.
Pro Chef Tips
- Don’t Overmix: Overmixing the batter, especially after adding the flour, develops the gluten too much, leading to cakey rather than fudgy brownies. Mix until just combined.
- Gel Food Coloring is Key: Liquid food coloring can thin out your batter and won’t give you as vibrant a color. Opt for a good quality gel food coloring for the best red hue. You might need to use a fair amount to get that deep red.
- Bake Until Just Set: The secret to fudgy brownies is not to overbake them. They should still look slightly underdone in the center when you pull them from the oven. A toothpick inserted should come out with moist crumbs, not liquid batter. They will continue to set as they cool.
- Cool Completely: Patience is a virtue here! Cutting warm brownies can result in a gooey mess and compromise their texture. Let them cool fully, preferably for several hours or even overnight, for the cleanest cuts and the best fudgy bite.
Creative Twists
While perfect as is, these Fudgy Red Velvet Brownies can be customized for different flavors and occasions:
- Cream Cheese Swirl: Before baking, dollop spoonfuls of a simple cream cheese frosting (cream cheese, powdered sugar, and a touch of vanilla) over the brownie batter and swirl gently with a knife for a beautiful marbled effect and extra tang.
- Chocolate Chip Variation: Feel free to mix in white chocolate chips, dark chocolate chunks, or even a mix of both for added texture and chocolatey goodness.
- Nutty Crunch: For those who love a bit of crunch, fold in some chopped pecans or walnuts into the batter.
- Espresso Boost: Add 1-2 teaspoons of instant espresso powder to the cocoa and butter mixture. It won’t make the brownies taste like coffee but will deepen and enhance the chocolate flavor.
- Minty Fresh: For a festive twist, a few drops of peppermint extract (start with 1/4 teaspoon and add more to taste) can transform these into a holiday treat, especially when topped with a minty cream cheese frosting.
Your Questions Answered
Why are my red velvet brownies not red enough?
A: This is usually due to the type or amount of food coloring used. Liquid food coloring often doesn’t provide as vibrant a hue as gel food coloring, and you might need to use a generous amount of gel coloring to achieve that deep, rich red velvet color. The vinegar or buttermilk also helps activate the red in the cocoa, so don’t skip it!
Can I make these without food coloring?
A: Absolutely! Without the red food coloring, they’ll be delicious chocolate brownies with a hint of red velvet’s characteristic flavor (from the cocoa and vinegar/buttermilk), but they won’t have the iconic red appearance. They’ll still be fudgy and tasty!
What’s the difference between red velvet cake and red velvet brownies?
A: Both share the characteristic cocoa flavor with a hint of tang, and the signature red color. However, red velvet cake tends to be lighter and fluffier in texture, often with a subtle crumb, while red velvet brownies, like all good brownies, are designed to be dense, chewy, and intensely fudgy. The texture is the primary differentiator.

Fudgy Red Velvet Brownies
Equipment
- 8×8-inch baking pan
- medium microwave-safe bowl
- whisk
- separate small bowl
- wire rack
Ingredients
Wet Ingredients
- 1/2 cup unsalted butter
- 1 cup granulated sugar
- 2 large eggs
- 1 teaspoon vanilla extract
- 1/2 teaspoon white vinegar
- 1 tablespoon red food coloring gel food coloring works best
Dry Ingredients
- 1/2 cup all-purpose flour
- 1/4 cup unsweetened cocoa powder Dutch-processed preferred
- 1/2 teaspoon baking soda
- 1/4 teaspoon salt
Fold-in
- 1/2 cup chocolate chips milk, semi-sweet, or white – your preference
Instructions
Preparation
- Preheat your oven to 350°F (175°C) and prepare an 8×8-inch baking pan by greasing and flouring it or lining it with parchment paper.
- Melt the butter in a microwave-safe bowl, then whisk in the granulated sugar until well combined and glossy.
Mixing
- Whisk in the eggs one at a time, followed by the vanilla extract, ensuring the mixture is smooth and glossy.
- Stir in the red food coloring and white vinegar until the color is vibrant and evenly distributed.
- In a separate bowl, combine the flour, cocoa powder, baking soda, and salt.
- Gently fold the dry ingredients into the wet mixture until just combined, being careful not to overmix, then fold in the chocolate chips.
Baking
- Pour the batter into the prepared pan and bake for 25-30 minutes, or until a toothpick inserted into the center comes out with moist crumbs.
- Allow the brownies to cool completely in the pan on a wire rack before cutting to ensure fudginess and clean slices.