The first time I attempted Marshmallow Swirl Fudge, I envisioned smooth, rich chocolate playing peek-a-boo with fluffy white marshmallow. What I got was a slightly grainy, mostly-chocolate block with a few sad, submerged white streaks. It was edible, but far from the dreamy confection I’d pictured. That’s when I realized that while fudge seems simple, getting that perfect swirl and creamy texture requires a few smart moves. This isn’t just about mixing ingredients; it’s about understanding the nuances that transform good fudge into truly amazing, picture-perfect Marshmallow Swirl Fudge.
Why You’ll Love This Dish
There’s something uniquely comforting and luxurious about a perfectly crafted piece of Marshmallow Swirl Fudge. It’s a nostalgic treat that instantly transports you back to childhood, but with a grown-up richness that makes it irresistible. This isn’t just candy; it’s a statement. It’s surprisingly quick to whip up, making it ideal for last-minute gifts, holiday platters, or simply satisfying that intense chocolate craving on a cozy night in. Plus, seeing those beautiful marshmallow swirls emerge is incredibly satisfying – an edible work of art you created yourself.
> “I used to be intimidated by making fudge, but these tips for Marshmallow Swirl Fudge made it so easy! My family raved about it and asked for the recipe. The swirls turned out stunning!” – A Happy Home Cook
The Cooking Process Explained
Making Marshmallow Swirl Fudge generally involves a few key stages: first, you’ll prepare a rich chocolate fudge base on the stovetop, bringing it to a specific temperature to ensure the right consistency. This chocolate base is then poured into a prepared pan. The magic of the marshmallow swirl happens next, where dollops of melted marshmallow crème are strategically placed over the hot fudge and gently swirled in, creating those beautiful ribbons. Finally, it chills until firm, ready to be cut into delicious squares.
What You’ll Need
Ingredient List
- 3 cups semi-sweet chocolate chips (good quality makes a difference!)
- 1 (14-ounce) can sweetened condensed milk
- 1/4 cup unsalted butter
- 1 teaspoon vanilla extract
- 1 (7-ounce) jar marshmallow crème (such as Fluff or Jet-Puffed)
Helpful Cooking Tips
- Quality Chocolate Matters: Using good quality chocolate chips will significantly impact the flavor and texture of your fudge. Cheaper chocolate can sometimes lead to a greasier or less smooth end product.
- Don’t Over-Swirl: This is crucial for distinct marshmallow ribbons. A few gentle swirls with a knife are all you need. Over-swirling will just blend the two layers into a muddy mess.
Directions to Follow
- Prepare Your Pan: Line an 8×8-inch square baking pan with parchment paper, leaving an overhang on the sides to easily lift the fudge out later. Lightly grease the parchment paper for extra insurance against sticking.
- Melt the Fudge Base: In a heavy-bottomed saucepan over low heat, combine the chocolate chips, sweetened condensed milk, and butter. Stir constantly until the chocolate and butter are completely melted and the mixture is smooth and glossy. Be patient and keep the heat low to prevent scorching.
- Add Vanilla: Remove the saucepan from the heat and stir in the vanilla extract until fully combined.
- Pour the Fudge: Immediately pour the hot chocolate fudge mixture into the prepared pan, spreading it evenly with a spatula.
- Create the Swirl: Spoon dollops of the marshmallow crème over the hot fudge. Don’t worry about being perfect; aim for about 6-8 dollops spaced out.
- Swirl Gently: Take a butter knife or a skewer and gently drag it through the marshmallow and fudge in a swirling pattern. Make broad, sweeping motions rather than tight circles to create beautiful, distinct swirls. Remember, less is more here!
- Chill Time: Place the pan in the refrigerator for at least 2-4 hours, or until the fudge is completely firm.
- Cut and Serve: Once firm, use the parchment paper overhangs to lift the fudge out of the pan. Place it on a cutting board and cut into 1-inch squares.
Best Ways to Enjoy It
This Marshmallow Swirl Fudge is a star on its own, but it also makes a fantastic addition to a dessert board, paired with fresh berries, nuts, or other small cookies. For a truly decadent experience, serve a square alongside a cup of strong coffee or a glass of cold milk. It’s also marvelous as a sweet finish to a potluck or as a thoughtful homemade gift packaged in a decorative tin.
Keeping Leftovers Fresh
To store your Marshmallow Swirl Fudge, place it in an airtight container between layers of parchment paper at room temperature for up to 1 week. If you need it to last longer, you can refrigerate it for up to 2-3 weeks, though the texture might firm up slightly. For extended storage, fudge freezes beautifully! Wrap individual pieces or blocks tightly in plastic wrap, then place them in a freezer-safe bag or container for up to 3 months. Thaw at room temperature before serving.
Pro Chef Tips
- Low and Slow is the Way to Go: When melting the chocolate, sweetened condensed milk, and butter, resist the urge to crank up the heat. Low heat prevents scorching the chocolate and ensures a silky-smooth fudge base. Patience here pays off immensely.
- Temperature Matters for Swirling: The fudge needs to be hot when you add the marshmallow crème. This helps the marshmallow soften slightly, making it easier to swirl and ensuring it adheres well to the fudge base without getting clumpy.
- Clean Knife for Clean Cuts: For perfectly neat squares, use a sharp knife that has been run under hot water and then wiped dry before each cut. This prevents the fudge from dragging and sticking.
- Don’t Rush the Chill: Fudge needs proper time to set. Rushing this step will result in soft, sticky squares that don’t hold their shape. The refrigerator is your friend for achieving that perfect firm, sliceable consistency.
Creative Twists
- Nutty Swirl: Before swirling the marshmallow, sprinkle a layer of chopped walnuts, pecans, or almonds over the fudge base for added crunch.
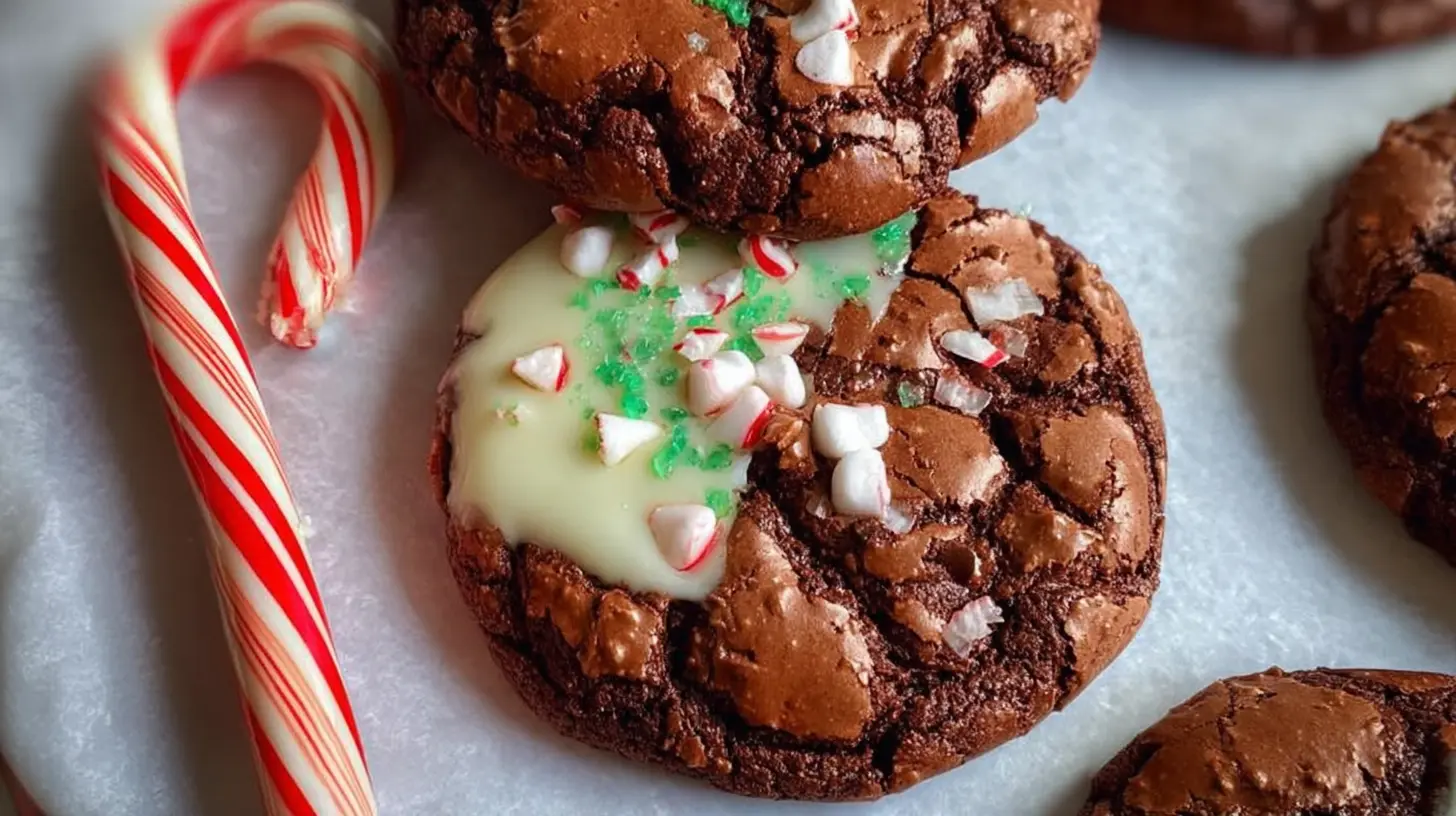
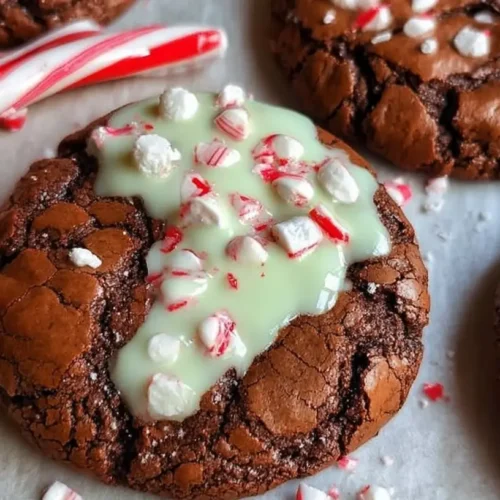
- Peppermint Twist: During the holiday season, add 1/2 teaspoon of peppermint extract to the chocolate fudge mixture along with the vanilla. Crush some candy canes and sprinkle them over the top before chilling for a festive touch.
- Salted Caramel Swirl: Instead of plain marshmallow crème, gently swirl in some store-bought or homemade salted caramel sauce alongside the marshmallow for a different kind of gooey ribbon.
- Espresso Kick: Dissolve 1 teaspoon of instant espresso powder in 1 tablespoon of hot water and stir it into the chocolate fudge mixture for a deeper, more sophisticated flavor profile.
Common Questions
FAQ
Q: Why is my fudge grainy?
A: Grainy fudge often happens when the sugar crystals don’t fully dissolve during the cooking process. Ensure you’re stirring constantly over low heat until the mixture is completely smooth and no sugar crystals remain. Overheating can also lead to graininess.
Q: Can I use marshmallows instead of marshmallow crème?
A: While possible, it’s a bit trickier. You’d need to melt the marshmallows (preferably mini marshmallows) with a tiny bit of butter or water until smooth before attempting to swirl them. Marshmallow crème is specifically designed for ease of use in applications like this, offering a smoother, less sticky swirl.
Q: How do I get really distinct white swirls?
A: The key is to work quickly when you add the marshmallow crème to the hot fudge and to not over-swirl. Just a few gentle passes with your knife are enough to create beautiful, separate ribbons. If you stir too much, the white will blend into the chocolate.
Marshmallow Swirl Fudge
Equipment
- 8×8 inch baking pan
- large microwave-safe bowl
- knife
Ingredients
Fudge Base
- 14 ounce can sweetened condensed milk
- 2 cups high-quality semi-sweet or milk chocolate chips about 12 ounces
- 1/4 cup unsalted butter 4 tablespoons
- salt Pinch
Flavor & Swirl
- 1 teaspoon vanilla extract
- 1.5 cups mini marshmallows about 5 ounces, or larger marshmallows cut down
Instructions
Preparation
- Line an 8×8 inch baking pan with parchment paper, allowing an overhang on the sides, then lightly grease the parchment paper.
Cooking the Fudge
- Combine condensed milk, chocolate chips, butter, and salt in a large microwave-safe bowl or double boiler. Heat and stir until completely smooth and melted.
- Remove from heat and stir in the vanilla extract until well combined.
Assembling & Chilling
- Pour two-thirds of the chocolate mixture into the prepared pan and spread evenly, then immediately sprinkle half of the mini marshmallows over this layer. Gently pour the remaining chocolate mixture on top, spreading to cover the marshmallows.
- Dot the remaining mini marshmallows over the top and gently swirl through the layers with a knife or skewer in a figure-eight or zigzag pattern to create marshmallow ribbons.
- Refrigerate the fudge for at least 2-3 hours, or until completely firm and set.
Serving
- Once firm, lift the fudge out of the pan using the parchment paper overhang. Cut into small squares with a sharp knife, wiping the knife with a warm, damp cloth between slices for clean cuts.