Spooky Bites and Happy Haunts
Hey there, fellow foodies and Halloween enthusiasts! Remember those childhood Halloweens filled with giddy anticipation, the rustling of costumes, and the promise of sweet treats? As adults, we might swap out trick-or-treating for more sophisticated celebrations, but that doesn’t mean we have to sacrifice the fun (or the deliciousness!). This year, let’s infuse a little extra magic into our spooky season with something truly special: Halloween mini pizzas. Forget the store-bought snacks; we’re about to embark on a culinary adventure that’s as easy as it is exciting, perfect for creating heartwarming memories with your loved ones. Get ready to transform ordinary ingredients into extraordinary, bite-sized delights!
Why You’ll Love These Halloween Mini Pizzas
These Halloween mini pizzas aren’t just another recipe; they’re an experience! Here’s why they’re about to become your new favorite spooky season tradition:
- Effortlessly Festive: No complicated carving or intricate decorating needed! Achieve maximum spooky appeal with minimal effort.
- Kid-Friendly Fun: Involve the little ghouls and goblins in the kitchen – they’ll love creating their edible masterpieces.
- Party Perfect: The ideal appetizer or snack for any Halloween gathering, big or small.
- Customizable Creativity: Endless possibilities for toppings and spooky designs to unleash your inner artist.
- Deliciously Satisfying: Because who doesn’t love pizza, especially when it’s dressed up for Halloween?
How to Make Halloween Mini Pizzas
Ready to conjure up some magic in the kitchen? Follow these simple steps to create your enchanting Halloween mini pizzas.
Ingredients of Halloween Mini Pizzas
Gather your ghoulish goodies:
- For the Crust:
- Pre-made mini pizza bases, English muffins, pita bread, or cut-out puff pastry circles.
- Olive oil (for brushing)
- For the Sauce:
- Your favorite pizza sauce (store-bought or homemade)
- For the Cheese:
- Shredded mozzarella cheese
- Provolone slices (for ghost cutouts)
- For the Toppings and Spooky Decorations:
- Pepperoni (for mummy strips or spider bodies)
- Black olives (for spider legs or creepy eyes)
- Green olives, sliced (for monster eyes)
- Bell peppers (orange for pumpkins, green for stems)
- Mushrooms, sliced
- Fresh basil or parsley (for garnish)
- Optional: Food-grade edible marker for drawing faces
Directions of Halloween Mini Pizzas
Follow these steps for frightfully good Halloween mini pizzas:

- Preheat & Prep: Preheat your oven according to your pizza base instructions (usually 375-400°F / 190-200°C). Lightly grease a baking sheet or line with parchment paper. Arrange your mini pizza bases.
- Sauce It Up: Spread a thin layer of pizza sauce evenly over each base, leaving a small border for the crust.
- Cheesy Foundation: Sprinkle a generous amount of shredded mozzarella over the sauce.
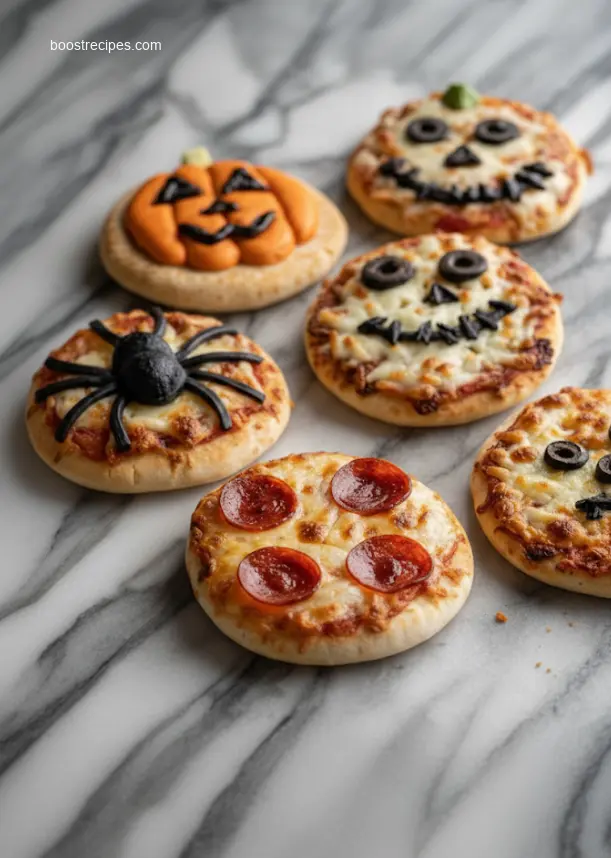
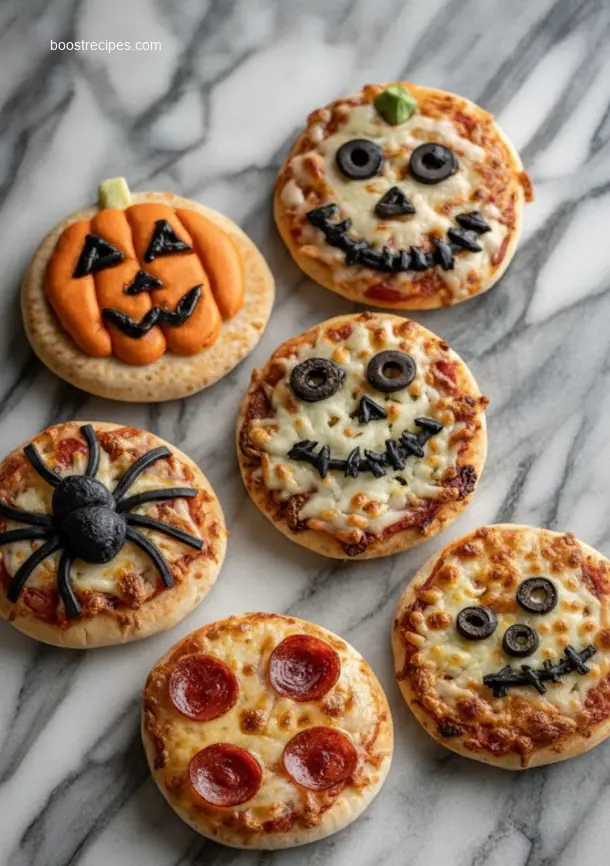
- Design Your Dino, Ghost, or Ghoul! This is where the fun begins for your Halloween mini pizzas:
- Mummy Pizzas: Lay strips of pepperoni across the pizza, resembling bandages (leaving a gap for eyes). Place two small olive slices or green olive halves for eyes.
- Spider Pizzas: Place a large round pepperoni or olive in the center for the spider’s body. Cut thin strips of black olive to arrange as eight legs.
- Ghost Pizzas: Use a small ghost-shaped cookie cutter to cut shapes from provolone cheese slices. Place these ghosts on top of the mozzarella. Add tiny black olive pieces for eyes.
- Jack-O’-Lantern Pizzas: Cut small triangles from orange bell pepper for eyes and a nose, and a thin strip for a mouth.
- Bake to Perfection: Bake for 8-12 minutes, or until the cheese is melted and bubbly and the crust is golden brown. Keep an eye on them to prevent burning.
- Cool & Serve: Carefully remove the Halloween mini pizzas from the oven. Let them cool slightly before serving.
How to Serve Halloween Mini Pizzas
Elevate your Halloween mini pizzas experience with these creative ideas! Make your spooky spread complete:
- “Witch’s Brew” Dipping Sauce: Serve with a side of ranch dressing dyed green with a drop of food coloring.
- Graveyard Garden: Arrange your mini pizzas on a platter with some fresh herbs resembling foliage.
- Paired with a Potion: Serve alongside a spooky punch or sparkling cider.
How to Store Halloween Mini Pizzas
Store any leftover Halloween mini pizzas in an airtight container in the refrigerator for up to 2-3 days. Reheat them in the oven or an air fryer for best texture.
Tips to Make Halloween Mini Pizzas
- Don’t Overload: Too many toppings can make your mini pizzas soggy.
- Pre-Cook Meats: If using sausage or other raw meats, pre-cook them before adding to the pizzas.
- Kid-Friendly Cutting: For younger helpers, pre-cut toppings into manageable shapes.
- Golden Crust: Brushing the edges of your mini pizza bases with a little olive oil before baking can help achieve a lovely golden crust.
Variations
Get adventurous with your Halloween mini pizzas:
- Veggie Ghoul Pizzas: Use broccoli florets for “trees,” sliced bell peppers for “pumpkins,” and corn kernels for “teeth.”
- Sweet & Spooky Pizzas: Use a dessert crust, spread with Nutella, and decorate with fruit cut into spooky shapes (strawberries for “blood,” banana slices for “ghosts”).
- Breakfast “Brain” Mini Pizzas: Use scrambled eggs as a base, topped with cheese and sausage shaped like a brain.
FAQs
Got more questions about making the best Halloween mini pizzas? We’ve got answers!
Can I make the Halloween mini pizzas ahead of time?
Yes, you can prepare the bases and toppings a day in advance. Store toppings separately in airtight containers in the refrigerator. Assemble and bake the Halloween mini pizzas just before serving for the best results.
What are some allergy-friendly options for Halloween mini pizzas?
For gluten-free, use gluten-free pizza bases. For dairy-free, use vegan cheese alternatives. You can also focus on vegetable toppings for a naturally dairy-free option by omitting cheese.
How can I make my Halloween mini pizzas look extra spooky?
Get creative with cookie cutters for cheese shapes (ghosts, bats). Use black olive halves for eyeballs. A food-grade edible marker can draw intricate spiderwebs or monster faces on melted cheese after baking.
Halloween Mini Pizzas
Spook up your dessert table with these delightfully ghoulish Creepy Eye Pies! A flaky crust filled with sweet cherry pie filling, topped with a marshmallow ‘eyeball’ and a chocolate chip iris, perfect for Halloween treats.
Total Time: 35 mins
Yield: 6 mini pies 1x
Ingredients
Scale
1 pre-made pie crust, thawed
1 (21 oz) can cherry pie filling
6 large marshmallows
6 chocolate chips
Red food coloring gel
1 tablespoon milk
Instructions
1. Preheat your oven to 400°F (200°C).
2. Unroll the pie crust and cut out 6 individual circles using a cookie cutter or glass. You can re-roll scraps if needed.
3. Press each pie crust circle into a muffin tin or ramekin.
4. Fill each pie crust with approximately 2 tablespoons of cherry pie filling.
5. Bake for 12-15 minutes, or until the crust is golden brown.
6. While the pies are baking, prepare the ‘eyeballs’. Flatten each marshmallow slightly with your fingers.
7. Once pies are out of the oven and slightly cooled, place one flattened marshmallow on top of the cherry filling in each pie.
8. Return to the oven for 2-3 minutes, just until the marshmallows are lightly toasted and softened. Watch carefully to prevent burning.
9. Remove from oven. Immediately press one chocolate chip, pointed side down, into the center of each marshmallow to create the iris.
10. Using a thin brush or toothpick, draw small red “bloodshot” lines radiating from the chocolate chip onto the marshmallow with the red food coloring gel.
11. Let cool completely before serving your delicious Creepy Eye Pies.
Notes
For a richer flavor, you can add 1/4 teaspoon almond extract to the cherry pie filling before baking. These Creepy Eye Pies are a fantastic festive treat for Halloween parties or a fun baking project with kids. Yields 6 mini pies.
- Prep Time: 20 mins
- Cook Time: 15 mins
- Category: Dessert
- Method: Baking
- Cuisine: American
- Diet: Vegetarian
Nutrition
- Serving Size: 1 mini pie
- Calories: 280
- Sugar: 35g
- Sodium: 180mg
- Fat: 12g
- Saturated Fat: 3g
- Unsaturated Fat: 8g
- Trans Fat: 0g
- Carbohydrates: 40g
- Fiber: 2g
- Protein: 3g
- Cholesterol: 5mg
Halloween Mini Pizzas: 7 Easy Weeknight Treats
Equipment
- baking sheet
- parchment paper
- oven
Ingredients
Pizza Base
- 7 pre-made pizza bases small
- 1 cup cherry tomatoes halved
Sauce & Cheese
- 100 ml tomato puree
- 200 g mozzarella cheese grated
Toppings
- 1 jar olives pitted and sliced
- 2 bell peppers various colors, sliced into strips
- 100 g salami or pepperoni sliced
- 1 handful fresh basil for garnish
Instructions
Preparation
- Preheat your oven to 200°C (390°F) and line a baking sheet with parchment paper.
- Spread a thin layer of tomato puree over each mini pizza base.
Assembling the Pizzas
- Sprinkle grated mozzarella cheese over the tomato puree on each pizza.
- Arrange olive slices to create spider bodies, and then use bell pepper strips or more olive pieces for legs.
- Create ghost shapes with sliced mozzarella or salami, using small pieces of olives for eyes.
- Add various toppings like halved cherry tomatoes and bell pepper strips to complete your spooky designs.
Baking
- Bake for 10-15 minutes, or until the cheese is melted and bubbly and the crusts are golden brown.
- Carefully remove the pizzas from the oven and garnish with fresh basil, then let them cool slightly before serving.