My first bite of a Mini Cannoli Cup was pure bliss — all the creamy, ricotta-filled goodness of a classic cannoli, but in a perfectly portioned, easy-to-handle bite. It was at a friend’s dessert party, and I was immediately struck by how clever and convenient these little treats were. No more messy fillings or broken shells; just delightful, individual servings of Italian pastry magic. If you’re looking to bring that same “wow” factor to your next gathering, or simply treat yourself to something extraordinary, you’re in the right place. We’re about to explore not just how to make these adorable desserts, but also six fantastic ways to elevate them and truly impress your guests.
What Makes This Recipe Special?
There’s a reason Mini Cannoli Cups are cropping up on dessert tables everywhere. For starters, they capture the essence of a traditional cannoli’s rich, sweet ricotta filling and crisp shell, but in a much more approachable format. You get all the flavor without the fuss of deep-frying individual cannoli shells or dealing with fragile pastries. They’re quick to assemble, making them perfect for a last-minute dessert craving or a busy host. Plus, their mini size makes them ideal for parties and potlucks, allowing guests to easily grab and enjoy them. And honestly, who can resist a dessert that’s both elegant and utterly adorable?
> “These Mini Cannoli Cups are a game-changer! I used to dread making cannoli because of the frying, but this version is so easy and just as delicious. My family devoured them!” – A Satisfied Home Baker
How This Recipe Comes Together
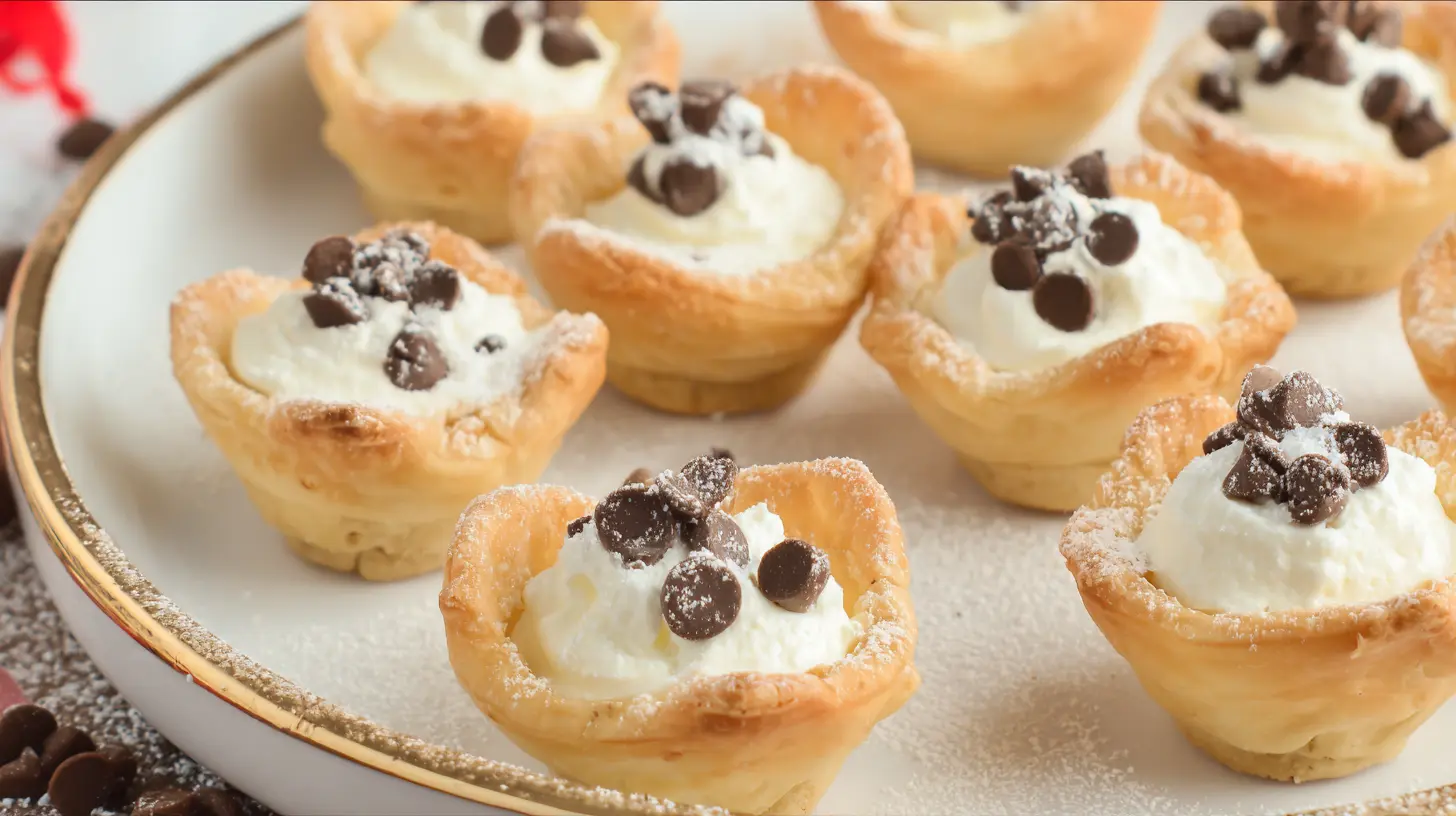
Creating these delightful Mini Cannoli Cups is surprisingly straightforward, and it’s all about combining classic flavors in a convenient new form. You’ll begin by preparing the “cups,” often using a simple dough or even pre-made options for ease. The real magic happens with the rich, creamy ricotta filling, a blend of fresh ricotta, powdered sugar, and delightful flavorings. Once your cups are baked and cooled, it’s a simple matter of piping in the luscious filling and adding your favorite toppings. It’s a quick journey from simple ingredients to a show-stopping dessert!
What You’ll Need
Here’s a breakdown of the key players you’ll need to bring these Mini Cannoli Cups to life:
- For the Cups:
- 1 (10-ounce) can refrigerated biscuit dough (such as Pillsbury Grands! Flaky Layers)
- Alternatively, use won ton wrappers or homemade pie crust dough for a different texture.
- For the Filling:
- 15 ounces whole milk ricotta cheese, drained well (this is crucial for a thick filling!)
- 1/2 cup powdered sugar, sifted
- 1/2 teaspoon vanilla extract
- 1/4 teaspoon almond extract (optional, but adds depth)
- 2 tablespoons mini chocolate chips
- 2 tablespoons candied orange peel, finely chopped (optional, for authentic flavor)
- For Garnish/6 Ways to Wow:
- Powdered sugar, for dusting
- Additional mini chocolate chips
- Chopped pistachios
- Sprinkles (various colors)
- Finely chopped maraschino cherries
- Melted dark chocolate for drizzling or dipping
- Lemon zest
Directions to Follow
Let’s get baking! Follow these steps for perfect Mini Cannoli Cups:
- Prepare the Cups: Preheat your oven to 375°F (190°C). Spray a 24-cup mini muffin tin with non-stick spray. Open the biscuit dough and separate each biscuit. For each cup, flatten a biscuit and press it gently into a mini muffin cup, forming a small cup. If using won ton wrappers, press two wrappers into each cup, offsetting them slightly.
- Bake the Cups: Bake for 8-12 minutes, or until the biscuit cups are golden brown and cooked through. If using won ton wrappers, they’ll be golden and crisp in about 6-8 minutes. Remove from the oven and immediately use a small spoon or the back of a measuring spoon to gently press down the centers, creating a deeper well for the filling. Let cool completely in the muffin tin on a wire rack.
- Drain the Ricotta: While the cups bake and cool, prepare the ricotta. Place a fine-mesh sieve over a bowl and line it with cheesecloth or a few layers of paper towels. Spoon the ricotta cheese into the sieve and let it drain in the refrigerator for at least 30 minutes, or up to several hours. This step is vital to prevent a watery filling.
- Make the Filling: In a medium bowl, combine the drained ricotta, sifted powdered sugar, vanilla extract, and almond extract (if using). Beat with an electric mixer on medium speed until smooth and creamy. Gently fold in the mini chocolate chips and chopped candied orange peel (if using).
- Fill the Cups: Once the baked cups are completely cool, transfer the ricotta filling to a piping bag fitted with a star or round tip (or a freezer bag with the corner snipped off). Pipe a generous amount of filling into each cooled biscuit or won ton cup.
- Garnish and Serve: Dust lightly with powdered sugar. Now, for the fun part – choose your favorite garnishes from our “6 Ways to Wow” section below and decorate! Serve immediately or chill until ready to serve.
Best Ways to Enjoy It
Mini Cannoli Cups are inherently festive, making them perfect for potlucks, birthday parties, holiday gatherings, or even a sophisticated afternoon tea. They truly shine when served as a dessert that allows guests to pick and choose their favorite toppings. Pair them with a strong espresso, a sweet dessert wine, or even a classic limoncello for an authentic Italian experience.
How to store & freeze
These cannoli cups are best enjoyed fresh, as the biscuit or won ton shells can soften from the filling over time.
- Storage: If you have leftover filled cannoli cups, store them in an airtight container in the refrigerator for up to 1-2 days. The shells may become slightly less crisp, but they’ll still be delicious.
- For best results: Store the cooled, baked cups and the prepared filling separately. Keep the empty cups in an airtight container at room temperature for up to 3 days, and the filling in an airtight container in the refrigerator for up to 3-4 days. Assemble just before serving for maximum crispness.
- Freezing: I don’t recommend freezing the assembled cannoli cups, as the texture of the filling and shells will suffer. You can freeze the empty, baked biscuit cups for up to 1 month. Thaw at room temperature before filling.
Helpful cooking tips
- Drain the Ricotta Properly: This is arguably the most important step for a thick, stable filling. Don’t rush it! Skipping this will result in a watery, runny filling.
- Don’t Overfill: Fill the cups just before serving if possible to maintain crispness.
- Sift Your Powdered Sugar: This prevents lumps in your smooth ricotta filling.
- Cool Completely: Ensure your baked cups are entirely cool before filling, otherwise the heat will melt the filling.
- Taste and Adjust: Feel free to adjust the sweetness of the filling to your liking. Add more powdered sugar if you prefer a sweeter taste.
Creative Twists
Here are 6 innovative ways to decorate and flavor your Mini Cannoli Cups to truly impress your guests:
- Classic Sicilian: Dust with powdered sugar, dip half the top in mini chocolate chips, and the other half in finely chopped pistachios.
- Lemon Zest Zing: Stir a teaspoon of fresh lemon zest into the ricotta filling for a bright, citrusy twist. Garnish each cup with a tiny curl of lemon zest.
- Chocolate Lover’s Dream: Drizzle melted dark chocolate generously over the filled cups. You can even dip the rim of the baked cups in melted chocolate before filling for an extra layer of decadence.
- Berry Delight: Top each cannoli cup with a fresh raspberry or a small piece of a strawberry, perhaps with a tiny mint leaf for color.
- Sprinkle Party: For a fun, kid-friendly option, let guests customize their own with various colorful sprinkles. This is a huge hit!
- Nutty Crunch: Instead of just pistachios, try finely chopped walnuts or almonds for different textures and flavors. You can even lightly toast them first for added depth.
FAQ
Q1: Can I make the cannoli cups gluten-free?
A1: Yes! You can substitute the canned biscuit dough with a gluten-free refrigerated biscuit dough or use gluten-free won ton wrappers. Ensure all other ingredients are also certified gluten-free if catering to strict dietary needs.
Q2: How far in advance can I prepare the filling?
A2: The ricotta filling can be made up to 3-4 days in advance and stored in an airtight container in the refrigerator. Just give it a good stir before piping it into the cups. Remember to bake and cool the cups separately, filling them as close to serving time as possible for the best texture.
Q3: What if I don’t have a piping bag?
A3: No problem at all! You can easily spoon the filling into the cooled cups using a small spoon. For a slightly neater look, scoop the filling into a sturdy freezer bag, snip off one corner to create an opening, and use it just like a piping bag.

Mini Cannoli Cups with Orange Zest and Chocolate Chips
Equipment
- Mini Muffin Tin
- Electric Mixer
- Piping Bag (or Ziploc Bag)
Ingredients
For the Cannoli Cups:
- 1 package (12 ounces) wonton wrappers
- Cooking spray or melted butter (for brushing)
- 2 tablespoons granulated sugar (optional, for sprinkling)
- 1/2 teaspoon ground cinnamon (optional, for sprinkling)
For the Ricotta Filling:
- 15 ounces whole milk ricotta cheese (about 1 ¾ cups), drained well
- 1 cup powdered sugar sifted
- 1/2 teaspoon vanilla extract
- 1/4 teaspoon almond extract (optional, but highly recommended!)
- salt Pinch of
- 2 tablespoons miniature chocolate chips or finely chopped bittersweet chocolate
- 1 tablespoon orange zest (from about half an orange)
For Garnish (Optional):
- Extra miniature chocolate chips
- Chopped pistachios
- Powdered sugar for dusting
Instructions
Prepare the Wonton Cups
- Preheat oven to 375°F (190°C) and lightly grease a 24-cup mini muffin tin.
- Press wonton wrappers into muffin cups, shaping them into cups; optionally, spray with cooking spray or melted butter and sprinkle with cinnamon-sugar mixture.
- Bake for 8-10 minutes until golden brown and crispy, then cool completely in the muffin tin.
Prepare the Ricotta Filling
- Combine drained ricotta cheese, sifted powdered sugar, vanilla extract, almond extract (if using), and a pinch of salt in a medium bowl.
- Beat with an electric mixer until smooth and creamy, then gently fold in miniature chocolate chips and orange zest.
Fill and Serve
- Spoon the ricotta filling into a piping bag fitted with a star tip (or a Ziploc bag with a corner snipped off), then pipe the filling into each cooled wonton cup.
- Garnish immediately with extra miniature chocolate chips, chopped pistachios, or powdered sugar, and serve.