
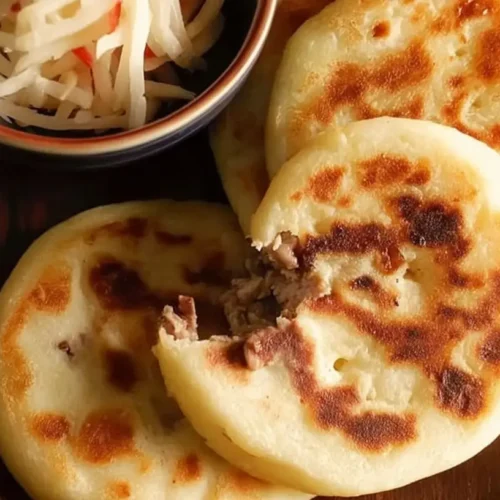
There’s something incredibly satisfying about biting into a warm, slightly crispy masa shell, only to discover a molten, cheesy center. My first experience with pupusas was at a local Salvadoran festival, and I was instantly hooked. The way the corn masa combined with the savory cheese was pure magic. Since then, I’ve been on a mission to recreate that magic at home, especially for those weeknights when a quick, comforting meal is exactly what’s needed. If you’ve been dreaming of authentic flavors or just need a delicious solution to dinner dilemmas, then getting these “Homemade Masa Cheese Pupusas” on your table is going to be a game-changer.
Why You’ll Love This Dish
This isn’t just another recipe; it’s an invitation to elevate your weeknight meals with a taste of Salvadoran comfort food. What makes these homemade masa cheese pupusas so special, especially with our focus on four quick methods?
For starters, they’re incredibly satisfying and versatile. The earthy flavor of the masa perfectly complements the gooey, salty cheese, making for a truly memorable bite. They’re also surprisingly budget-friendly, relying on staple ingredients you likely already have or can easily find. If you’ve got a family, these are a huge hit – kids adore the cheesy surprise, and you can easily customize them to suit different tastes. Plus, learning our four quick methods means you can whip these up faster than you might imagine, making them perfect for busy weeknights when you still crave something homemade and special.
> “I never thought I could make pupusas at home, but these methods made it so easy! My family devoured them, and they tasted even better than the restaurant ones. A truly satisfying and fun cooking experience!” – Maria P.
The Cooking Process Explained
Making these delicious homemade masa cheese pupusas involves a few key stages: preparing the masa dough, making the cheese filling, forming the pupusas, and finally, cooking them to golden perfection. Our four quick methods will guide you through variations in how you approach these stages, making the process smoother and faster. Essentially, you’ll mix the masa flour with water to create a pliable dough, prepare a simple cheese filling (often just shredded cheese), then you’ll take a small ball of dough, create an indentation, stuff it with cheese, and carefully seal it before flattening it into a disc. The final step is cooking these discs on a hot griddle until they’re beautifully browned and the cheese is melted and bubbly. It’s a hands-on, rewarding process that isn’t nearly as intimidating as it might sound!
What You’ll Need
To embark on your pupusa-making adventure, gather these essential items. The beauty of pupusas lies in their simple, wholesome ingredients.
- Masa Harina: This is crucial – specifically the instant corn masa flour used for tortillas and pupusas, not cornmeal. Maseca is a widely available brand.
- Warm Water: For mixing the masa dough to the right consistency.
- Salt: Just a pinch to flavor the masa.
- Cheese: A good melting cheese is key. Oaxaca cheese is traditional, but mozzarella, Monterey Jack, or even a blend of mild cheddar and mozzarella work wonderfully, especially for quick melting.
- Vegetable Oil: A little for cooking the pupusas and for oiling your hands – this prevents the dough from sticking.
Directions to Follow
Here’s how to bring your homemade masa cheese pupusas to life, incorporating the four quicker methods for various parts of the process.
Method 1: The Classic Hand-Forming (Quick for small batches)
- Prepare the Masa Dough: In a large bowl, combine 2 cups masa harina with 1 ½ cups warm water and ½ teaspoon salt. Mix with your hands until a soft, pliable dough forms. It should be moist but not sticky. If it’s too dry, add a little more water, a tablespoon at a time. If too sticky, add a little more masa harina. Cover the bowl with a damp cloth and let it rest for 5-10 minutes.
- Prepare the Cheese Filling: Shred 1 ½ cups of your chosen cheese. Keep it simple and delicious.
- Form the Pupusas: Lightly oil your hands. Take a golf-ball sized amount of masa dough and roll it into a smooth ball. Using your thumb, make a deep indentation in the center of the ball, forming a cup.
- Stuff and Seal: Spoon about 1-2 tablespoons of shredded cheese into the cup. Gently bring the edges of the masa dough up over the cheese, pinching and sealing the opening to enclose the filling completely.
- Flatten: Carefully flatten the filled ball between your palms into a disc, about ¼ to ½ inch thick. Try not to press too hard, or the cheese might burst through. Aim for a diameter of 4-5 inches.
- Cook: Heat a non-stick skillet or griddle over medium heat. Lightly oil the surface. Place the pupusas on the hot griddle and cook for 3-5 minutes per side, or until golden brown spots appear and the cheese inside is melted and bubbly. You might see a little cheese oozing out – that’s a good sign!
Method 2: Using Plastic Wrap for Easier Flattening (Faster, less sticky)
Follow steps 1-4 from Method 1. Once the pupusas are stuffed and sealed:
- Flatten with Plastic: Place the sealed dough ball between two pieces of lightly oiled plastic wrap or inside a plastic bag (like a cut-open Ziploc).
- Press: Use a flat plate, a cutting board, or even your hands to gently press down on the plastic-covered ball, flattening it into a disc of the desired thickness. This helps create a more even pupusa and keeps your hands cleaner.
- Cook: Carefully peel off the plastic wrap and cook the pupusas as in step 6 of Method 1.
Method 3: The “Taco” Method for Filling (Less mess, quick stuffing)
Follow step 1 from Method 1. Instead of creating an indentation for the cheese, we’ll make a different shape:
- Form a “Taco” Shell: Take a small ball of dough and flatten it quickly into a thick, small disc (about 2-3 inches wide).
- Fill and Fold: Place about 1-2 tablespoons of cheese onto one half of the disc. Fold the other half over like a taco, pressing the edges to seal.
- Re-shape: Gently flatten the half-moon shape into a full disc between your palms or using the plastic wrap method (Method 2, steps 5-6). This can sometimes be quicker for beginners.
- Cook: Cook as in step 6 of Method 1.
Method 4: Pre-mixed Cheese Masa (Fastest for cheesy dough)
This method is great if you want to skip the stuffing step and have a more integrated cheesy flavor throughout the masa.
- Prepare Cheesy Masa: In a large bowl, combine 2 cups masa harina, 1 ½ cups warm water, ½ teaspoon salt, and add 1 cup of shredded cheese directly into the masa dough. Mix with your hands until a soft, pliable dough forms, ensuring the cheese is evenly distributed. Adjust water/masa as needed. Cover and rest for 5-10 minutes.
- Form Pupusas: Lightly oil your hands. Take a golf-ball sized amount of the cheesy masa dough and roll it into a smooth ball.
- Flatten: Flatten the ball between your palms (or using Method 2 with plastic wrap) into a disc, about ¼ to ½ inch thick. No need to stuff – the cheese is already in there!
- Cook: Heat a non-stick skillet or griddle over medium heat. Lightly oil the surface. Place the pupusas on the hot griddle and cook for 3-5 minutes per side, or until golden brown spots appear and the cheese (now integrated into the masa) is melted and the pupusa is cooked through.
How to Serve Homemade Masa Cheese Pupusas
These delightful pupusas are a meal in themselves, but they truly shine when paired with traditional accompaniments. The quintessential serving suggestion is with curtido and salsa roja.
- Curtido: This tangy, slightly spicy fermented cabbage slaw (similar to sauerkraut but with chilies, carrots, and oregano) provides a fantastic counterpoint to the rich, cheesy pupusa. Its crunch and acidity are a perfect match.
- Salsa Roja: A simple, vibrant cooked tomato salsa adds another layer of fresh, savory flavor.
- Plating: Arrange 2-3 pupusas on a plate, generously topped with curtido and a dollop of salsa. The colors are beautiful, and the flavors are harmonious.
- Pairings: For a heartier meal, you could serve them alongside refried beans or a simple avocado salad. A crisp, cold beer or a refreshing tamarind drink would also be excellent choices.
Storage and Reheating Tips
Making a batch of pupusas means you might have some delicious leftovers, or you might want to prepare them in advance.
- Storage: Once cooled, stack pupusas with a piece of parchment paper in between to prevent sticking. Store them in an airtight container in the refrigerator for up to 3-4 days.
- Freezing: For longer storage, freeze cooked pupusas. Again, place parchment paper between them and freeze them in a single layer on a baking sheet until solid. Transfer them to a freezer-safe bag or container. They can be frozen for up to 2-3 months.
- Reheating:
- From the Fridge: Reheat on a lightly oiled skillet or griddle over medium-low heat for 3-5 minutes per side, until warmed through and slightly crispy. You can also microwave them for a quicker option, but they might lose some crispness (start with 30-60 seconds, then in 15-second intervals).
- From Frozen: You can reheat directly from frozen on a lightly oiled griddle or oven (at 350°F / 175°C) until thoroughly heated, which might take 10-15 minutes, flipping halfway. Ensure the internal temperature reaches 165°F (74°C) for food safety.
Helpful Cooking Tips
Making perfect pupusas can feel like an art, but a few pro tips will guarantee success and help you achieve that authentic taste and texture.
- Dough Consistency is Key: The masa dough should be like soft play-doh – pliable, moist, but not sticky. If it sticks to your hands, add a tiny bit more masa harina. If it cracks easily, add a tiny bit more warm water. Don’t be afraid to adjust. Oiling your hands (and even the plastic wrap for Method 2) helps immensely.
- Don’t Overstuff: While tempting to load up on cheese, too much filling can make it hard to seal the pupusa and increase the chances of a cheesy blowout on the griddle. Start with a moderate amount.
- Gentle Handling: Once stuffed, handle the pupusas gently while flattening. Excess pressure can cause the filling to break through the masa.
- Medium Heat is Best: Cook pupusas on medium heat. Too low, and they’ll be dry; too high, and they’ll burn before cooking through or melting the cheese properly. You want that golden-brown crust and fully melted interior.
- Rest the Masa: Allowing the masa dough to rest for 5-10 minutes (covered with a damp cloth) lets the masa harina fully hydrate, resulting in a smoother, more flexible dough that’s easier to work with.
Creative Twists
While classic cheese pupusas are undeniable, there are plenty of ways to get creative and tailor them to your taste or dietary needs.
- Additions to the Cheese:
- Jalapeño: Finely diced jalapeño (remove seeds for less heat) can be mixed with the cheese for a spicy kick.
- Loroco: This edible flower bud is a traditional Salvadoran addition, offering a unique, slightly floral, and earthy flavor. You can often find it jarred or frozen in Latin American markets.
- Beans: Mix refried beans (frijoles refritos) with cheese for a popular “revueltas” style pupusa.
- Chicharrón: Crispy fried pork belly (chicharrón) ground with a little tomato sauce is another classic filling.
- Vegan/Dairy-Free: You can easily swap out the dairy cheese for a good quality vegan shredded cheese that melts well.
- Herbs: A pinch of dried oregano or finely chopped cilantro mixed into the dough or cheese filling can add an aromatic touch.
- Different Masa Flours: While masa harina is standard, experimenting with blue corn masa harina can create a visually striking and slightly earthier pupusa.
Common Questions
Got questions about making your homemade masa cheese pupusas? We’ve got answers!
Why are my pupusas cracking when I try to flatten them?
A: This usually means your masa dough is too dry. Add a tablespoon of warm water at a time, mixing well, until the dough is moist and pliable without being sticky. Also, ensure you’re not pressing too hard; gentle, even pressure is key.
My cheese isn’t melting properly, or it’s oozing out too much. What’s wrong?
A: If the cheese isn’t melting, your griddle heat might be too low, or you might be cooking them too quickly. Ensure your heat is medium. If the cheese is oozing out excessively, it could be due to overstuffing the pupusa or not sealing the dough properly. Practice makes perfect – aim for a good seal and a modest amount of filling.
Can I make the masa dough ahead of time?
A: Yes, you can! Prepare the masa dough as directed, then wrap it tightly in plastic wrap or place it in an airtight container to prevent it from drying out. Store it in the refrigerator for up to 24 hours. Before using, let it come to room temperature for about 15-20 minutes and knead it briefly with wet hands, adding a tiny bit of water if it feels too dry.
Classic Homemade Masa Cheese Pupusas with 10 Flavor Twists
Equipment
- large bowl
- damp cloth or plastic wrap
- comal
- cast-iron skillet
- non-stick pan
Ingredients
For the Masa Dough:
- 2 cups masa harina (look for “para pupusas” if available, otherwise regular masa harina for tortillas)
- 1 ½ to 2 cups warm water (adjust as needed)
- ½ teaspoon salt
- 1 tablespoon vegetable oil (optional, for softer dough)
Basic Cheese Filling:
- 2 cups shredded Oaxaca cheese, mozzarella, or a blend of Monterey Jack and cheddar (Oaxaca is traditional and melts beautifully)
Flavor Twist Fillings (Choose your favorites from the 10 ideas!):
- ½ cup refried beans (well-mashed)
- ½ cup cooked and crumbled chorizo sausage
- ¼ cup finely diced pickled jalapeños
- 2 tablespoons cream cheese
- 1 tablespoon minced fresh garlic
- 1 tablespoon chopped fresh cilantro or parsley
- ¼ cup roasted poblano peppers (diced)
- ¼ cup corn kernels
- ½ cup wilted and squeezed dry spinach
- ¼ cup crumbled feta
- ½ cup finely chopped sautéed mushrooms
- 1 teaspoon fresh thyme
- ¼ cup finely chopped Kalamata olives
- 2 tablespoons sun-dried tomatoes (chopped)
- ½ cup mashed cooked sweet potato
- ¼ cup cooked black beans
- ¼ cup finely diced fresh pineapple
- 1 tablespoon minced habanero (use sparingly!)
For Frying:
- 2-3 tablespoons vegetable oil or lard for cooking
For Serving:
- Curtido (fermented cabbage slaw)
- Tomato salsa (salsa roja)
Instructions
Prepare the Masa Dough:
- Combine masa harina and salt, then gradually add warm water and mix to form a soft, pliable dough; adjust water or masa as needed.
- Knead for 2-3 minutes, then cover and let rest for 10-15 minutes to hydrate.
Prepare Your Fillings:
- While the masa rests, prepare your chosen flavor twist ingredients by finely chopping or mashing them.
- Combine each flavor twist ingredient with a portion of the shredded cheese in separate bowls.
Shape the Pupusas:
- Lightly oil your hands, take a golf-ball-sized piece of masa dough (about ¼ cup), and roll it into a sphere.
- Press a deep indentation into the center of the masa ball with your thumb to form a cup or pocket.
- Spoon 1-2 tablespoons of your chosen cheese filling into the pocket.
- Gently bring the edges of the masa dough over the filling, pinching to seal completely, then reform into a smooth ball.
- Gently flatten the filled ball between your palms into a disc about ¼ to ½ inch thick and 4-5 inches in diameter, being careful not to burst the filling.
Cook the Pupusas:
- Heat a comal, cast-iron skillet, or non-stick pan over medium heat with a little oil.
- Place pupusas on the hot griddle and cook for 5-7 minutes per side until golden brown and hollow-sounding when tapped.
Serve Hot:
- Remove from the griddle and serve immediately.