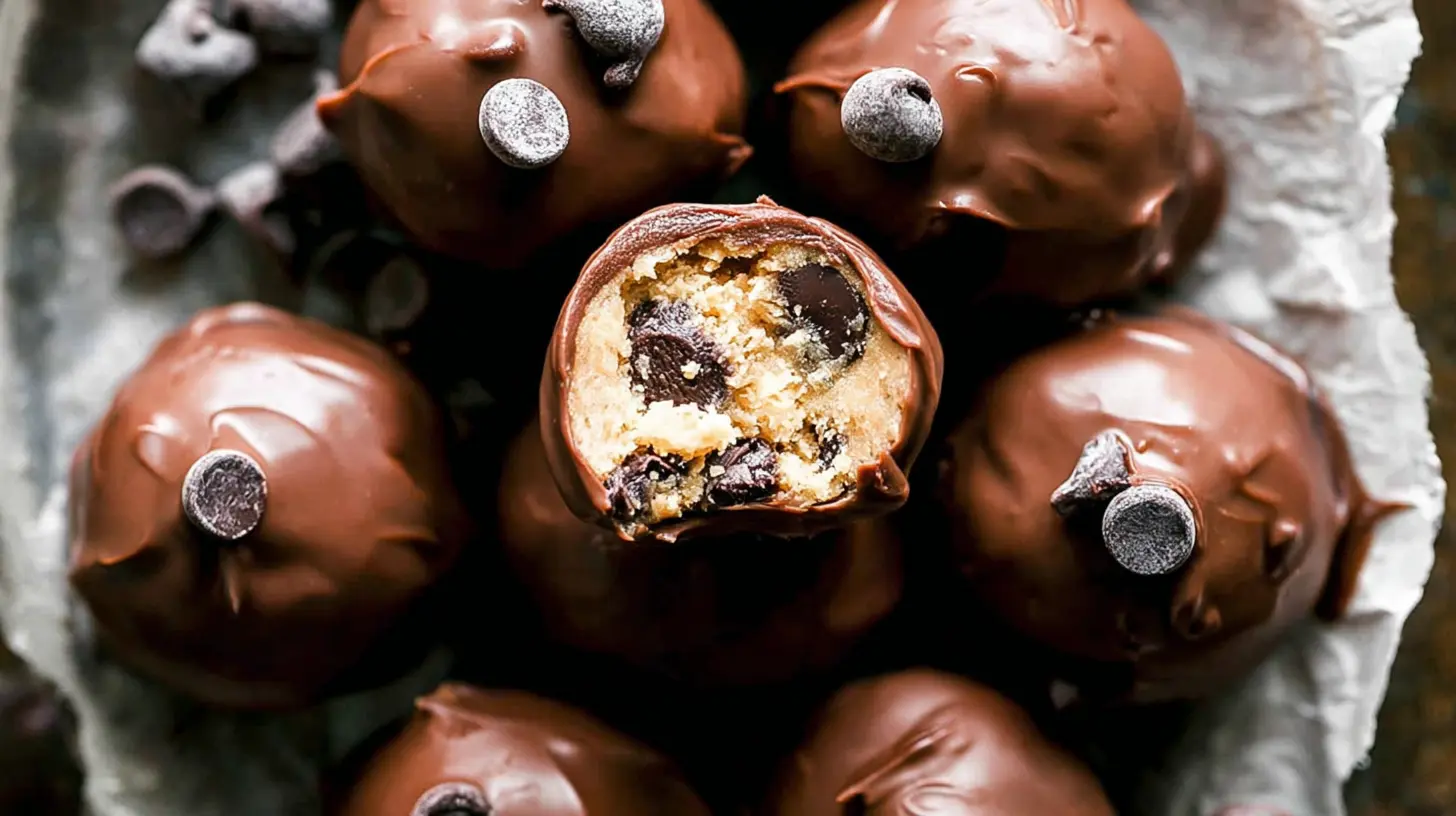
The first time I whipped up a batch of Chocolate Chip Cookie Dough Truffles, it was purely out of a craving for something decadent and no-bake that hit late one evening. I was skeptical that anything could truly capture that raw cookie dough magic without the actual baking, but oh, was I wrong. These little bites of heaven deliver all the nostalgic, comforting flavor of chocolate chip cookie dough, rolled into convenient, pop-able treats. If you’ve ever found yourself sneaking spoonfuls of dough from the mixing bowl, then this recipe, with its seven delightful variations, is about to become your new best friend.
Why You’ll Love This Dish
There’s something undeniably magical about cookie dough. It’s the taste of childhood, the thrill of a forbidden snack, and pure unadulterated comfort all rolled into one. These Chocolate Chip Cookie Dough Truffles capture that essence perfectly, but with a grown-up twist that makes them an ideal dessert for almost any occasion. You’ll love them because they’re:
- No-Bake Wonders: No oven required! This means less time heating up your kitchen and more time enjoying your treats.
- Quick & Easy: With minimal active prep time, you can have a batch ready in under an hour, making them perfect for last-minute cravings or unexpected guests.
- Customizable: As you’ll see, we’re not just making one type of truffle; we’re exploring seven fantastic variations, opening up a world of flavor possibilities.
- Crowd-Pleasing: Who doesn’t love cookie dough? These truffles are always a hit at parties, potlucks, or as a thoughtful homemade gift.
- Portion-Controlled Indulgence: Small, bite-sized, and satisfying, they offer a perfect little hit of sweetness without going overboard.
> “These cookie dough truffles are an absolute game-changer! So easy to make, and they taste exactly like eating raw cookie dough, but safer. My kids devoured them, and I loved experimenting with the different coatings. Five stars!” – A happy home baker
The Cooking Process Explained
Making Chocolate Chip Cookie Dough Truffles is surprisingly straightforward, relying on simple mixing, chilling, and coating. You’ll start by preparing a safe-to-eat cookie dough base, which involves heating your flour (a crucial step for making raw flour safe) and then combining it with butter, sugar, vanilla, and chocolate chips. Once your dough is perfectly mixed, you’ll roll it into bite-sized balls. The real fun begins with the coating and decorating, where those seven amazing variations come into play, transforming a simple truffle into a gourmet delight. A final chill sets everything, making them firm and ready to enjoy.
Key Ingredients
To embark on your truffle-making adventure, gather these items:
- Unsalted Butter: Softened to room temperature for easy creaming.
- Light Brown Sugar: Packed, for that classic chewy cookie flavor and moisture.
- Granulated Sugar: Standard sugar to balance the sweetness.
- Vanilla Extract: Don’t skimp on quality; it’s key to the cookie dough essence.
- All-Purpose Flour: Crucially, this needs to be heat-treated (see directions) to ensure it’s safe for consuming raw.
- Salt: Just a pinch to enhance all the sweet flavors.
- Milk: A splash helps bring the dough together to the right consistency.
- Mini Chocolate Chips: Essential for that authentic chocolate chip cookie experience.
- For Coating/Variations: Melting wafers or chocolate chips (milk, dark, white), sprinkles, nuts, cocoa powder, crushed cookies, edible glitter, etc. – get creative!
Directions to Follow
Let’s get those truffles made!
- Heat Treat the Flour: Spread the all-purpose flour on a baking sheet. Bake at 300°F (150°C) for 5-7 minutes, or microwave in a microwave-safe bowl on high for 1-2 minutes, stirring every 30 seconds, until it reaches 160°F (71°C). Let it cool completely. This step kills any potential bacteria, making the flour safe to eat raw.
- Cream the Butter and Sugars: In a large bowl, using an electric mixer, beat the softened unsalted butter, packed light brown sugar, and granulated sugar together until light and fluffy.
- Add Vanilla: Beat in the vanilla extract until well combined.
- Combine Dry Ingredients: In a separate small bowl, whisk together the cooled, heat-treated flour and salt.
- Mix Dough: Gradually add the flour mixture to the butter mixture, beating on low speed until just combined.
- Adjust Consistency: Slowly add milk, one tablespoon at a time, until the dough comes together and reaches a soft, pliable consistency that’s easy to roll, but not sticky.
- Fold in Chocolate Chips: Gently fold in the mini chocolate chips using a spatula.
- Chill Dough (Optional but Recommended): For easier rolling, cover the bowl and chill the dough in the refrigerator for 20-30 minutes.
- Roll Truffles: Scoop out spoonfuls of dough (about 1 tablespoon each) and roll them into smooth balls. Place them on a parchment-lined baking sheet.
- Chill Truffles: Place the baking sheet with the rolled truffles in the freezer for 15-20 minutes, or refrigerate for at least 30 minutes, until firm. This helps them hold their shape when coated.
- Prepare Coatings & Coat Truffles: Melt your chosen chocolate/melting wafers according to package directions. Dip each chilled truffle into the melted chocolate, allowing excess to drip off. Place back on the parchment-lined baking sheet. Immediately add any desired toppings for your chosen variations before the chocolate sets.
- Final Chill: Return the coated truffles to the refrigerator for at least 15-30 minutes, or until the chocolate coating is completely set.
Best Ways to Enjoy It
Chocolate Chip Cookie Dough Truffles are incredibly versatile when it comes to serving. Their small size and decadent flavor make them perfect for:
- Party Platters: Arrange them beautifully on a dessert tray for a potluck, birthday, or holiday gathering. The different variations add visual appeal and flavor diversity.
- Edible Gifts: Package them in small decorative boxes or cello bags with a ribbon. They make thoughtful homemade presents for friends, teachers, or neighbors.
- Dessert for Two: A few truffles after dinner are the perfect sweet ending to a cozy night in.
- Coffee or Tea Time: Pair them with your favorite hot beverage for a delightful afternoon pick-me-up.
- Ice Cream Topping: Break a few truffles into pieces and sprinkle them over a bowl of vanilla ice cream for an extra indulgent treat.
How to Store & Freeze
These truffles are best kept chilled to maintain their shape and freshness.
- Storage: Store Chocolate Chip Cookie Dough Truffles in an airtight container in the refrigerator for up to 1-2 weeks. Separate layers with parchment paper to prevent sticking.
- Freezing: For longer storage, place the set, coated truffles in a single layer on a baking sheet and freeze until solid (about 1-2 hours). Once frozen, transfer them to a freezer-safe airtight container or bag. They will keep well in the freezer for up to 2-3 months.
- Thawing: When ready to enjoy from the freezer, simply transfer them to the refrigerator for a few hours, or let them sit at room temperature for about 15-20 minutes until they reach your desired consistency.
Pro Chef Tips
- Don’t Skip the Flour Heat Treatment: Seriously, this is not optional! Raw flour can contain bacteria, so heat-treating it ensures your truffles are safe to eat.
- Use Quality Ingredients: Because this recipe is no-bake, the flavor of each ingredient truly shines. Splurge on good vanilla extract and quality chocolate chips.
- Chill, Chill, Chill: Chilling the dough before rolling and the truffles before coating is critical. It makes them much easier to handle and prevents them from melting or losing shape.
- Thin Chocolate Coating: When dipping, aim for a relatively thin layer of chocolate. A thick coating can overpower the cookie dough flavor and make them harder to bite into.
- Work in Batches: If you’re making many truffles or using multiple coatings, keep the truffles you’re not actively coating in the fridge to maintain their firmness.
Creative Twists
Here are 7 fantastic variations to transform your basic Chocolate Chip Cookie Dough Truffles:
- Classic Milk Chocolate & Sprinkles: Dip in melted milk chocolate, then immediately cover with festive rainbow sprinkles for that quintessential fun look.
- Dark Chocolate Sea Salt Dream: Dip in rich dark chocolate (60-70% cocoa) and sprinkle with a pinch of flaky sea salt. The salt truly enhances the chocolate and cookie dough flavors.
- White Chocolate & Oreo Crumble: Coat in melted white chocolate, then roll in finely crushed Oreo cookies (cream filling included!).
- Peanut Butter Swirl: Dip in melted milk or dark chocolate, then, while still wet, drizzle with melted peanut butter for a beautiful and delicious swirl. Use a toothpick to create patterns.
- Cocoa Powder Dust: For a simpler, elegant finish, roll some plain truffles in unsweetened cocoa powder for a rich, less sweet option.
- Toffee Crunch Delight: Dip in melted chocolate and roll in crushed toffee bits or Heath Bar pieces for a satisfying caramel crunch.
- Nutty Chocolate Lovers: Dip in milk or dark chocolate, then immediately roll in finely chopped toasted pecans, walnuts, or almonds for added texture and a nutty flavor profile.
Your Questions Answered
FAQ
Q: Can I use gluten-free flour for this recipe?
A: Yes, you can! Heat-treat your gluten-free all-purpose flour blend just like regular flour. The texture might be slightly different, but it should still work beautifully.
Q: Do I really need to heat-treat the flour?
A: Absolutely. Raw flour can contain harmful bacteria like E. coli. Heat-treating it (baking or microwaving to 160°F/71°C) makes it safe to consume raw, which is crucial for this no-bake recipe.
Q: How do I get my chocolate coating to be smooth and shiny?
A: Use good quality melting wafers or chocolate designed for melting (like compound chocolate or couverture). Melt it gently, either in a double boiler or in short bursts in the microwave, stirring frequently. Avoid overheating, and make sure no water gets into your chocolate, as this can cause it to seize. Tempering chocolate can also achieve a super shiny finish, but for home use, good quality melting chocolate is usually sufficient.

Classic Chocolate Chip Cookie Dough Truffles
Equipment
- microwave-safe plate
- instant-read thermometer
- medium bowl
- parchment-lined baking sheet
- small cookie scoop
- microwave-safe bowl
Ingredients
Cookie Dough
- 1 cup all-purpose flour
- 1/2 cup unsalted butter softened
- 1/4 cup granulated sugar
- 1/2 cup light brown sugar
- 2 tablespoons milk dairy or non-dairy
- 1 teaspoon vanilla extract
- 1/4 teaspoon salt
- 1/2 cup mini chocolate chips
Coating
- 1 cup melting chocolate chocolate chips or baking bar
- 1/2 teaspoon coconut oil optional, per cup of melting chocolate
Instructions
Preparation
- Heat treat the all-purpose flour by microwaving it until it reaches 160°F (71°C) then let it cool completely.
- In a medium bowl, beat the softened butter with granulated and brown sugars until light and fluffy.
- Stir in the milk and vanilla extract until well combined.
- Gradually add the cooled, heat-treated flour and salt to the wet ingredients, mixing until just combined.
- Gently fold in the mini chocolate chips until evenly distributed throughout the dough.
Assembly
- Using a small cookie scoop or your hands, roll the dough into 1-inch balls and place them on a parchment-lined baking sheet.
- Refrigerate the cookie dough balls for at least 30 minutes to firm up.
- In a microwave-safe bowl, melt the chocolate chips or chopped baking chocolate, stirring in coconut oil if desired.
- One by one, dip each chilled cookie dough ball into the melted chocolate, letting any excess drip off.
- Immediately after dipping, decorate with extra mini chocolate chips, sea salt, or sprinkles before the chocolate sets.
- Return the dipped truffles to the parchment-lined baking sheet and refrigerate for another 15-20 minutes until the chocolate coating is completely set.