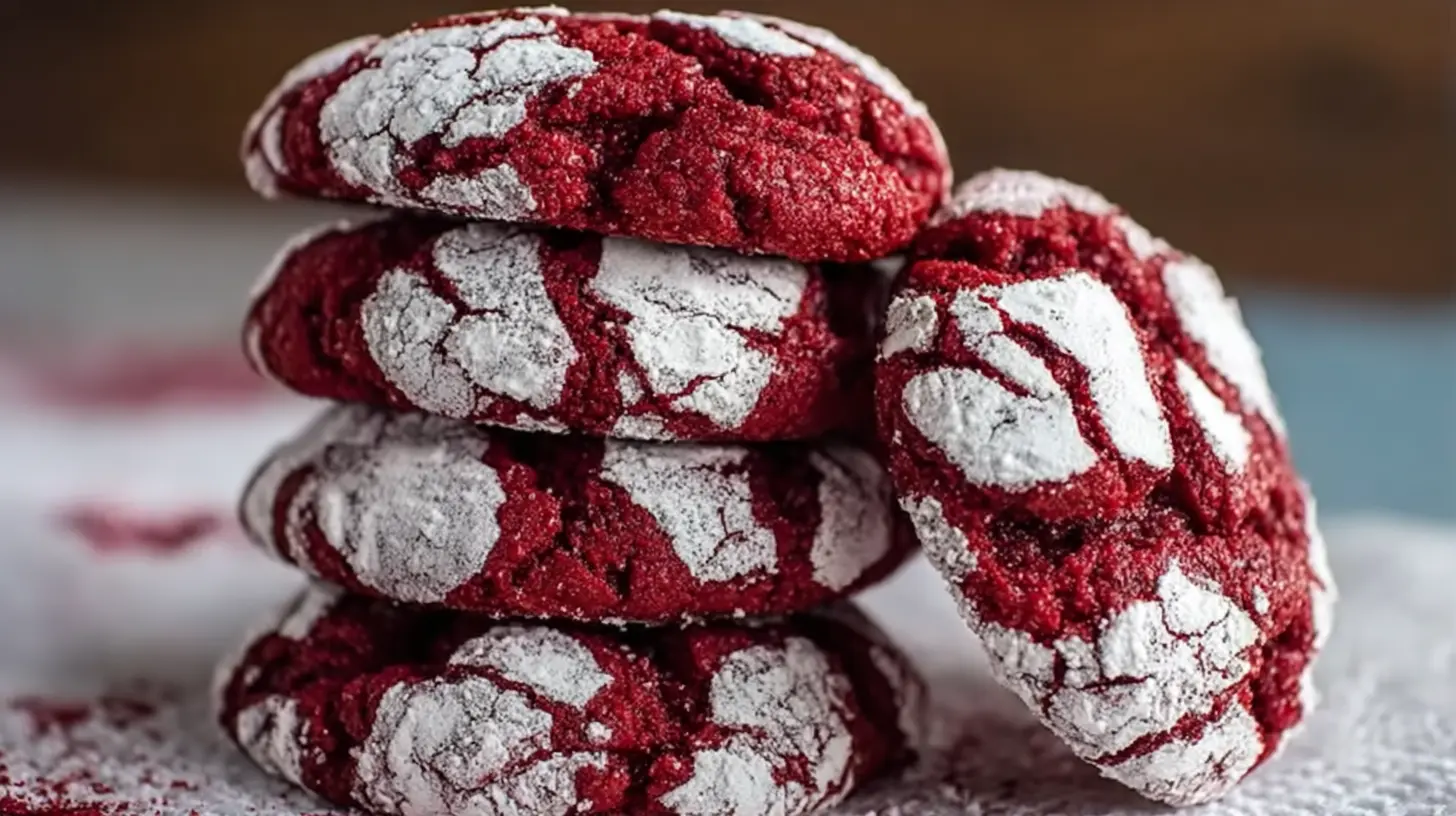
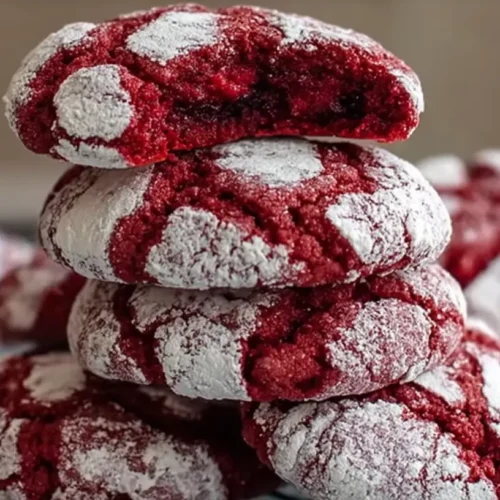
There’s just something magical about biting into a Red Velvet Crinkle Cookie. That vibrant crimson peeking through a snowy dusting of powdered sugar, the soft, chewy texture, and that unmistakable hint of cocoa and vanilla – it’s pure confectionary joy. I remember the first time I made these; the awe on my family’s faces when they saw the beautiful cracks emerge was priceless. It’s a dessert that consistently brings smiles, and if you haven’t tried baking them yet, you’re in for a real treat.
Why You’ll Love This Dish
These aren’t just any cookies; Red Velvet Crinkle Cookies offer a delightful blend of visual appeal and incredible flavor. They’re perfect for so many occasions – from a festive holiday cookie platter to a casual weeknight dessert, or even as a thoughtful homemade gift. If you’re looking for a relatively straightforward baking project that delivers maximum “wow” factor, this is it. Plus, the distinctive red color makes them a standout, turning heads and tempting taste buds wherever they go.
> “I made these Red Velvet Crinkle Cookies for a potluck, and they were the first thing to disappear! Everyone raved about the soft texture and perfect sweetness.” – A Happy Baker
The Cooking Process Explained
Making Red Velvet Crinkle Cookies is a surprisingly simple and rewarding experience. You’ll start by creaming together your wet ingredients, then gradually incorporate the dry ones, along with that essential red food coloring. The dough gets chilled to make it easier to handle, then rolled into balls, generously coated in powdered sugar, and baked until the signature crinkles appear. It’s a process that’s not only easy to follow but also visually satisfying as you watch the cookies transform in the oven.
Gather These Items
This recipe calls for common baking ingredients, ensuring you won’t need to hunt for anything exotic.
- 2 ½ cups all-purpose flour
- ½ cup unsweetened cocoa powder
- 1 teaspoon baking soda
- ¼ teaspoon salt
- 1 cup (2 sticks) unsalted butter, softened
- 2 cups granulated sugar
- 2 large eggs
- 1 tablespoon vanilla extract
- 2 tablespoons red food coloring (gel food coloring provides a more vibrant hue)
- ½ cup buttermilk
- 1 cup powdered sugar, for rolling
Directions to Follow
Follow these steps for beautifully crinkled, delicious cookies:
- Whisk Dry Ingredients: In a medium bowl, whisk together the all-purpose flour, cocoa powder, baking soda, and salt. Set aside.
- Cream Butter and Sugar: In a large bowl, using an electric mixer, cream together the softened butter and granulated sugar until light and fluffy, about 2-3 minutes.
- Add Wet Ingredients: Beat in the eggs one at a time, ensuring each is fully incorporated before adding the next. Stir in the vanilla extract and red food coloring until the mixture is uniformly red.
- Alternate Dry and Wet: Gradually add the dry ingredient mixture to the wet ingredients, alternating with the buttermilk. Begin and end with the dry ingredients (e.g., add 1/3 dry, mix; add 1/2 buttermilk, mix; add 1/3 dry, mix; add 1/2 buttermilk, mix; add remaining 1/3 dry, mix). Mix until just combined; do not overmix.
- Chill the Dough: Cover the bowl with plastic wrap and refrigerate the dough for at least 2 hours, or until firm enough to roll. This step is crucial for achieving those perfect crinkles.
- Preheat Oven and Prep Pan: Preheat your oven to 350°F (175°C). Line baking sheets with parchment paper.
- Roll in Powdered Sugar: Place the powdered sugar in a shallow bowl. Scoop rounded tablespoons of dough and roll them into balls. Generously roll each dough ball in the powdered sugar, ensuring it’s completely coated. The thicker the powdered sugar coating, the more pronounced the crinkles will be.
- Bake: Place the coated dough balls about 2 inches apart on the prepared baking sheets. Bake for 10-12 minutes, or until the edges are just set and the centers are still slightly soft. The cookies will puff up and then crinkle as they cool.
- Cool: Let the cookies cool on the baking sheets for 5 minutes before transferring them to a wire rack to cool completely.
Best Ways to Enjoy It
These Red Velvet Crinkle Cookies are, quite simply, perfect on their own. However, if you’re feeling a little fancy, they pair wonderfully with a tall glass of cold milk, a warm cup of coffee, or even a scoop of vanilla bean ice cream for an extra decadent treat. For special occasions, arrange them on a platter with other festive cookies for a beautiful display.
How to Store & Freeze
To keep your Red Velvet Crinkle Cookies fresh, store them in an airtight container at room temperature for up to 3-5 days. If you want to extend their life, you can freeze them. Place the completely cooled cookies in a single layer on a baking sheet and freeze until solid. Then, transfer them to a freezer-safe bag or container, separating layers with parchment paper. They will keep well in the freezer for up to 2-3 months. Thaw at room temperature before serving.
Helpful Cooking Tips
- Don’t Skimp on the Chill Time: Chilling the dough is critical. It firms up the butter, preventing the cookies from spreading too much and allows the powdered sugar to adhere better, which in turn creates the signature crinkles.
- Gel Food Coloring is Key: While liquid food coloring works, gel food coloring provides a much more intense and vibrant red color without adding too much extra moisture to your dough.
- Generous Powdered Sugar Coating: Don’t be shy! Roll the dough balls thoroughly in the powdered sugar. A thick, even coating is what gives you those beautiful, contrasting white crinkles against the red cookie.
- Don’t Overbake: These cookies are best when they’re soft and chewy. Bake just until the edges are set; the centers will look slightly underdone but will continue to cook as they cool on the hot baking sheet.
Creative Twists
- Chocolate Drizzle: Once cooled, melt some white or dark chocolate and drizzle it over the cookies for an extra layer of decadence.
- Cream Cheese Glaze: For an even richer “red velvet” experience, whisk together some softened cream cheese, powdered sugar, and a splash of milk or vanilla extract for a simple glaze to drizzle over (or dip) the cooled cookies.
- Minty Twist: Add a few drops of peppermint extract along with the vanilla for a festive, mint chocolate red velvet cookie.
- Nutty Crunch: Roll the dough balls in finely chopped pecans or walnuts along with the powdered sugar for a slight textural contrast and nutty flavor.
Your Questions Answered
FAQ
Q: Why didn’t my cookies crinkle?
A: The most common reasons for a lack of crinkles are not chilling the dough sufficiently and not coating the dough balls generously enough with powdered sugar. Make sure the dough is firm, and aim for a thick, opaque layer of powdered sugar.
Q: Can I use different food coloring?
A: Absolutely! While red is traditional for “red velvet,” you can experiment with other gel food colorings for different holidays or themes. Green for Christmas, blue for a baby shower, or even orange for Halloween would all work well.
Q: Can I make the dough ahead of time?
A: Yes, you can! The dough can be made up to 2-3 days in advance and stored, covered, in the refrigerator. This can be a great time-saver if you’re baking for an event. Just allow it to soften slightly at room temperature for about 10-15 minutes before rolling if it’s too hard to work with.
Vibrant Red Velvet Crinkle Cookies
Equipment
- medium bowl
- whisk
- large bowl
- electric mixer
- plastic wrap
- baking sheets
- parchment paper
- shallow bowl
- wire rack
Ingredients
Dry Ingredients
- 2 ½ cups all-purpose flour
- ¾ cup unsweetened cocoa powder natural, not Dutch-processed
- 1 teaspoon baking soda
- ¼ teaspoon salt
Wet Ingredients
- ½ cup unsalted butter (1 stick) softened
- 1 ½ cups granulated sugar
- 2 large eggs
- 1 teaspoon vanilla extract
- 2 tablespoons red food coloring gel paste works best
- 2 tablespoons milk or buttermilk
Coating
- ½ cup powdered sugar for coating
Instructions
Preparation
- In a medium bowl, whisk together the flour, cocoa powder, baking soda, and salt, then set it aside.
- In a large bowl, cream the softened butter and granulated sugar with an electric mixer until light and fluffy (2-3 minutes).
- Beat in the eggs one at a time, then mix in the vanilla extract, red food coloring, and milk until the color is vibrant and evenly distributed.
- Gradually add the dry ingredients to the wet ingredients, mixing on low speed until just combined, being careful not to overmix.
- Cover the dough with plastic wrap and refrigerate for 30 minutes to 2 hours.
Baking
- Preheat your oven to 375°F (190°C) and line baking sheets with parchment paper.
- Place powdered sugar in a shallow bowl, scoop rounded tablespoons of chilled dough, roll them into balls, and generously coat each in powdered sugar.
- Arrange the coated dough balls on the prepared baking sheets, spaced 2 inches apart, and bake for 9-11 minutes until the edges are set and centers are slightly soft.
- Let the cookies cool on the baking sheets for 5 minutes, then transfer them to a wire rack to cool completely.