The first time I attempted meringue cookies, I envisioned delicate, airy clouds melting in my mouth. What I got instead was a sad, chewy mess that stuck to the roof of my mouth. After much trial and error (and a few more sticky situations), I cracked the code, and these Chocolate Meringue Cookies, especially with the three essential tips I’m about to share, are now a frequent and much-loved resident in my recipe repertoire.
Why You’ll Love This Dish
Are you looking for that perfect blend of crispy, melt-in-your-mouth sweetness with a delightful hint of chocolate? Then these Chocolate Meringue Cookies are absolutely for you! They’re surprisingly simple to make once you know the tricks, yet they feel incredibly gourmet. They’re naturally gluten-free and relatively low in fat, making them a fantastic lighter treat. Plus, their light and airy texture makes them ideal for an elegant dessert table, a sweet little pick-me-up with your coffee, or even a delightful homemade gift. They’re a wonderful project for a weekend afternoon, yielding impressive results that are sure to impress.
> “I thought meringues were too difficult until I tried this recipe! The tips made all the difference. My cookies turned out perfect – crisp on the outside and wonderfully chewy inside. A new favorite!” – Happy Baker on Instagram
The Cooking Process Explained
Making these chocolate meringue cookies revolves around whipping egg whites into a stable, glossy foam, gently folding in sugar and cocoa, and then baking them low and slow until crisp. The magic truly happens during the whipping stage, where air is incorporated to create that signature light texture. After piping charming little swirls, they slowly dry out in a low oven, transforming from soft dollops into delicate, crunchy confections. It’s a process that requires a bit of patience but offers incredible rewards.
What You’ll Need
To whip up these delightful Chocolate Meringue Cookies, gather these simple ingredients:
- Large Egg Whites: About 3-4, ensure they are at room temperature. This is crucial for optimal volume when whipping!
- Granulated Sugar: Fine-grain sugar works best for dissolving into the egg whites.
- Unsweetened Cocoa Powder: High-quality cocoa makes a noticeable difference in flavor.
- Pinch of Salt: Balances the sweetness and helps stabilize the egg whites.
- Vanilla Extract: Just a touch for added depth of flavor.
- Cream of Tartar (Optional, but recommended): A tiny bit helps stabilize the meringue, especially in humid conditions.
Directions to Follow
- Prep Your Workspace: Preheat your oven to a low 200°F (95°C). Line two baking sheets with parchment paper. This is non-negotiable – meringues stick easily.
- Separate with Care: Carefully separate your egg whites from the yolks. Even a tiny speck of yolk can prevent your whites from whipping properly. Ensure your bowl and whisk are impeccably clean and grease-free.
- Whip It Good: In a large, clean mixing bowl (preferably metal or glass), add the egg whites and a pinch of salt. Beat on medium speed with an electric mixer until soft peaks form – when you lift the whisk, the peaks gently curl over. If using, add the cream of tartar now.
- Sugar Slowly: Gradually add the granulated sugar, about a tablespoon at a time, while continuing to beat on medium-high speed. This step is critical; adding sugar slowly allows it to dissolve and build a stable meringue.
- Achieve Stiff Peaks: Continue beating until the meringue is glossy, thick, and holds stiff peaks. When you lift the whisk, the peaks should stand upright without drooping. When you rub a tiny bit between your fingers, it should feel smooth, not grainy. Stir in the vanilla extract.
- Fold in the Cocoa: Sift the cocoa powder over the meringue. Gently fold it in with a rubber spatula until just combined, being careful not to deflate the airy meringue. Overmixing will lead to flat cookies.
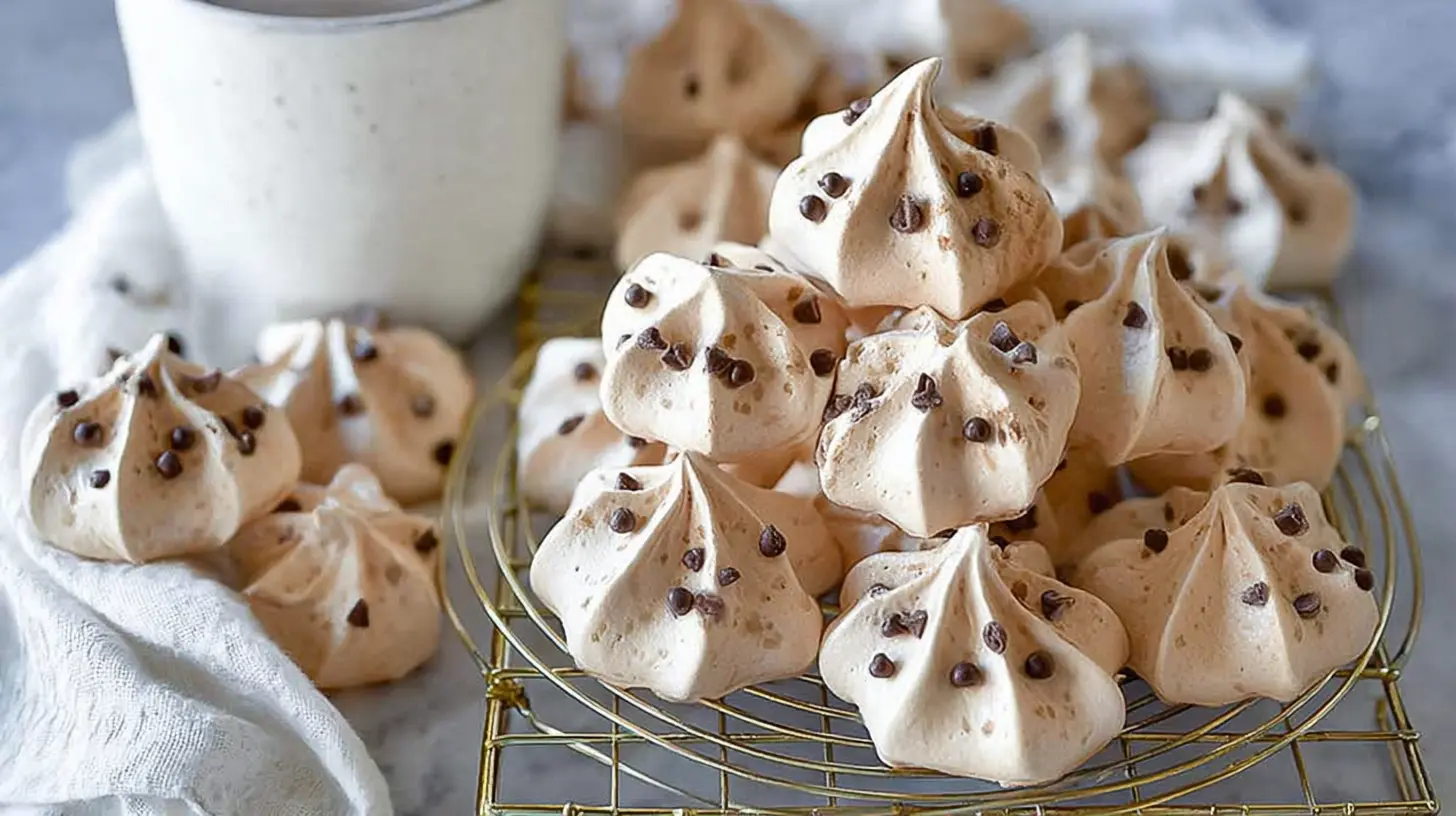
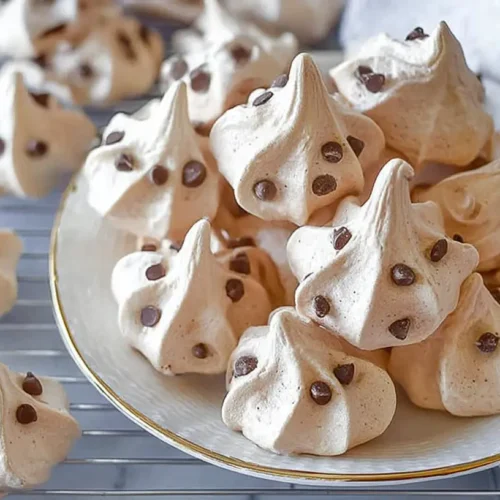
- Pipe Like a Pro: Transfer the meringue into a piping bag fitted with your desired tip (a star tip works beautifully). Pipe small rosettes or kisses onto the prepared parchment-lined baking sheets, leaving a little space between each.
- The Low-and-Slow Bake: Place the baking sheets in the preheated oven. Bake for 1 hour 30 minutes to 2 hours, or until the meringues are completely dry and crisp. They should lift easily from the parchment paper without sticking.
- Cool Down: Turn off the oven, but leave the meringues inside with the oven door slightly ajar for at least another hour, or even overnight, until completely cool. This helps prevent cracking and ensures they are perfectly crisp.
Best Ways to Enjoy It
Chocolate Meringue Cookies are wonderfully versatile! They’re perfect as a light dessert after a rich meal, offering a sweet palate cleanser. Serve them alongside fresh berries and a dollop of whipped cream for an elegant presentation. They also pair beautifully with a strong cup of coffee or a rich hot chocolate. For a fun treat, crush a few and sprinkle them over ice cream or yogurt, adding an irresistible crispy texture. You can even use them to decorate larger cakes or trifles for a touch of refined charm.
How to Store & Freeze
Once your Chocolate Meringue Cookies are completely cool and dry, proper storage is key to maintaining their crispness. Store them in an airtight container at room temperature for up to 1-2 weeks. Avoid refrigerating meringues as the humidity can make them soft and sticky. If they do become a little soft, you can try re-drying them in a very low oven (around 150°F/65°C) for 20-30 minutes, then letting them cool completely in the oven. Freezing is generally not recommended for baked meringues as the thawing process often introduces too much moisture, leading to a chewy or sticky texture rather than the desired crispness.
Tips to Make
Here are my top 3 must-know hacks for perfect Chocolate Meringue Cookies every single time:
- The Cleanest Tools are Your Best Friends: Any trace of grease (from yolks, oily hands, or an improperly washed bowl) will prevent your egg whites from whipping up properly. Use a metal or glass bowl (plastic bowls can retain grease), and wipe down your bowl and whisk with a paper towel dampened with lemon juice or vinegar before starting.
- Slow and Steady Wins the Sugar Race: Don’t dump all the sugar in at once. Adding it gradually, a tablespoon at a time while the mixer is running, allows the sugar crystals to dissolve into the egg whites and stabilize the foam. This creates a much stronger, glossier, and more stable meringue that won’t weep or collapse. Test by rubbing a bit between your fingers – it should feel completely smooth.
- Low and Slow is the Only Way to Go: Meringues don’t bake; they dry out. Baking them at a very low temperature for an extended period, followed by cooling completely in the turned-off oven, is crucial for that desired crisp-all-the-way-through texture and prevents cracking. Patience here will be greatly rewarded!
Creative Twists
Want to play around with your Chocolate Meringue Cookies? Here are a few ideas:
- Mint Chocolate: Add 1/4 teaspoon of peppermint extract along with the vanilla for a refreshing twist.
- Espresso Boost: Mix in 1 teaspoon of instant espresso powder with the cocoa for a richer, more complex chocolate flavor.
- Nutty Crunch: Fold in 1/4 cup of finely chopped toasted nuts (like walnuts or pecans) at the very end, just before piping.
- Swirls of Color: For a festive look, lightly streak your piping bag with a tiny bit of red or green food coloring gel before adding the meringue.
- Chocolate Dipped: Once completely cooled, dip half of your meringues in melted dark or white chocolate and let it set on parchment paper.
FAQ
How can I tell if my egg whites are at room temperature?
Room temperature egg whites are crucial for achieving maximum volume. You can leave them on the counter for 30 minutes to an hour, or for a quicker method, place the separated egg whites in a bowl inside a larger bowl of warm (not hot) water for 5-10 minutes.
What if my meringues crack during baking?
Cracking usually happens if the oven temperature is too high, causing the outside to dry too quickly before the inside. Ensure your oven thermometer is accurate and stick to the low temperature. Cooling them slowly in the oven with the door ajar also helps prevent sudden temperature changes that can lead to cracks.
Can I make these without a piping bag?
Absolutely! While a piping bag gives them that classic pretty shape, you can simply use two spoons to drop dollops of meringue onto the parchment paper. They might not look as uniform, but they’ll taste just as delicious!
Delicate Chocolate Meringue Cookies
Equipment
- Oven
- Baking Sheet
- Parchment Paper
- Electric Mixer
- Whisk Attachment
- Piping Bag (with star or round tip)
Ingredients
Meringue
- 2 large egg whites
- ½ cup granulated sugar
- 2 tablespoons unsweetened cocoa powder
- ¼ teaspoon cream of tartar
- Pinch salt
- ½ teaspoon vanilla extract
Instructions
Preparation
- Preheat your oven to 250°F (120°C) and line a large baking sheet with parchment paper to prevent sticking.
- In a clean, dry bowl of an electric mixer, beat egg whites, cream of tartar, and salt on medium speed until soft peaks form.
Making the Meringue
- Gradually add granulated sugar, one tablespoon at a time, while beating on high speed until the meringue is glossy, thick, and holds stiff peaks.
- Beat in the vanilla extract, then gently fold in the sifted cocoa powder until just combined, being careful not to overmix.
Baking
- Spoon or pipe small 1 to 1.5-inch cookies onto the baking sheet, leaving space between each.
- Bake for 60-75 minutes until firm, then turn off the oven, prop the door open, and let them cool completely inside the oven for crispness.