I remember my first time attempting sugar cookies from scratch. It involved a messy kitchen, a sprawling ingredient list, and a result that was, shall we say, less than delightful. That’s why I was absolutely thrilled to discover a recipe that promised the same classic, buttery-sweet goodness with just three simple ingredients. It felt like uncovering a secret, a shortcut to pure cookie joy without any compromise on flavor or texture. And trust me, these aren’t just easy; they’re genuinely delicious, becoming a staple for quick treats and impromptu baking sessions.
Why You’ll Love This Dish
What’s not to love about a cookie that delivers big on flavor with minimal fuss? These Delightful Sugar Cookies aren’t just another sweet treat; they’re a testament to the idea that sometimes less truly is more in the kitchen. They’re quick enough for a spontaneous baking craving but special enough to share with friends. If you’re looking for a recipe that’s budget-friendly, practically foolproof, and utterly delicious, you’ve found your match. They’re perfect for a quiet afternoon with a cup of tea, a fun activity with kids (who will adore cutting out shapes!), or when you need a last-minute dessert that tastes anything but.
How These Cookies Come Together
The beauty of these Delightful Sugar Cookies lies in their straightforward preparation. You’re essentially going to cream softened butter with sugar until it’s light and fluffy – this step is crucial for that melt-in-your-mouth texture. Next, you slowly incorporate the flour, mixing just until a soft, pliable dough forms. After a brief chill to make it easier to handle, you’ll roll out your dough, cut out your favorite shapes, and bake until they’re lightly golden. It’s truly a process that respects your time but yields a fantastic reward.
What You’ll Need
Key Ingredients:
- 1 cup (2 sticks) unsalted butter, softened
- 1 cup granulated sugar
- 2 ½ cups all-purpose flour
Ingredient Notes:
Always use unsalted butter so you can control the salt content later if you wish. Ensure your butter is properly softened, not melted, for the best creaming results. Good quality all-purpose flour is perfect for this recipe.
Directions to Follow
- Prepare for Baking: Preheat your oven to 375°F (190°C) and line baking sheets with parchment paper or silicone mats.
- Cream Butter and Sugar: In a large mixing bowl, using an electric mixer on medium speed, beat the softened butter and granulated sugar together until the mixture is light in color and fluffy, about 2-3 minutes. This incorporates air, which contributes to the cookies’ tender texture.
- Add Flour: Gradually add the all-purpose flour to the butter mixture, mixing on low speed until just combined. Be careful not to overmix; overmixing can develop the gluten too much, leading to tough cookies. The dough should come together in a soft ball.
- Chill (Optional but Recommended): If your dough feels too soft to roll immediately, wrap it in plastic wrap and refrigerate for 15-30 minutes. This makes it easier to handle and helps prevent the cookies from spreading too much.
- Roll and Cut: Lightly flour a clean work surface. Divide the dough in half. Roll out one half of the dough to about ¼-inch thickness. Use your favorite cookie cutters to cut out shapes.
- Transfer to Baking Sheet: Carefully transfer the cut-out cookies to the prepared baking sheets, leaving about an inch between each cookie. Re-roll any dough scraps until all dough is used.
- Bake: Bake for 8-10 minutes, or until the edges are lightly golden. Keep a close eye on them, as baking times can vary.
- Cool: Let the cookies cool on the baking sheets for a few minutes before transferring them to a wire rack to cool completely.
Best Ways to Enjoy It
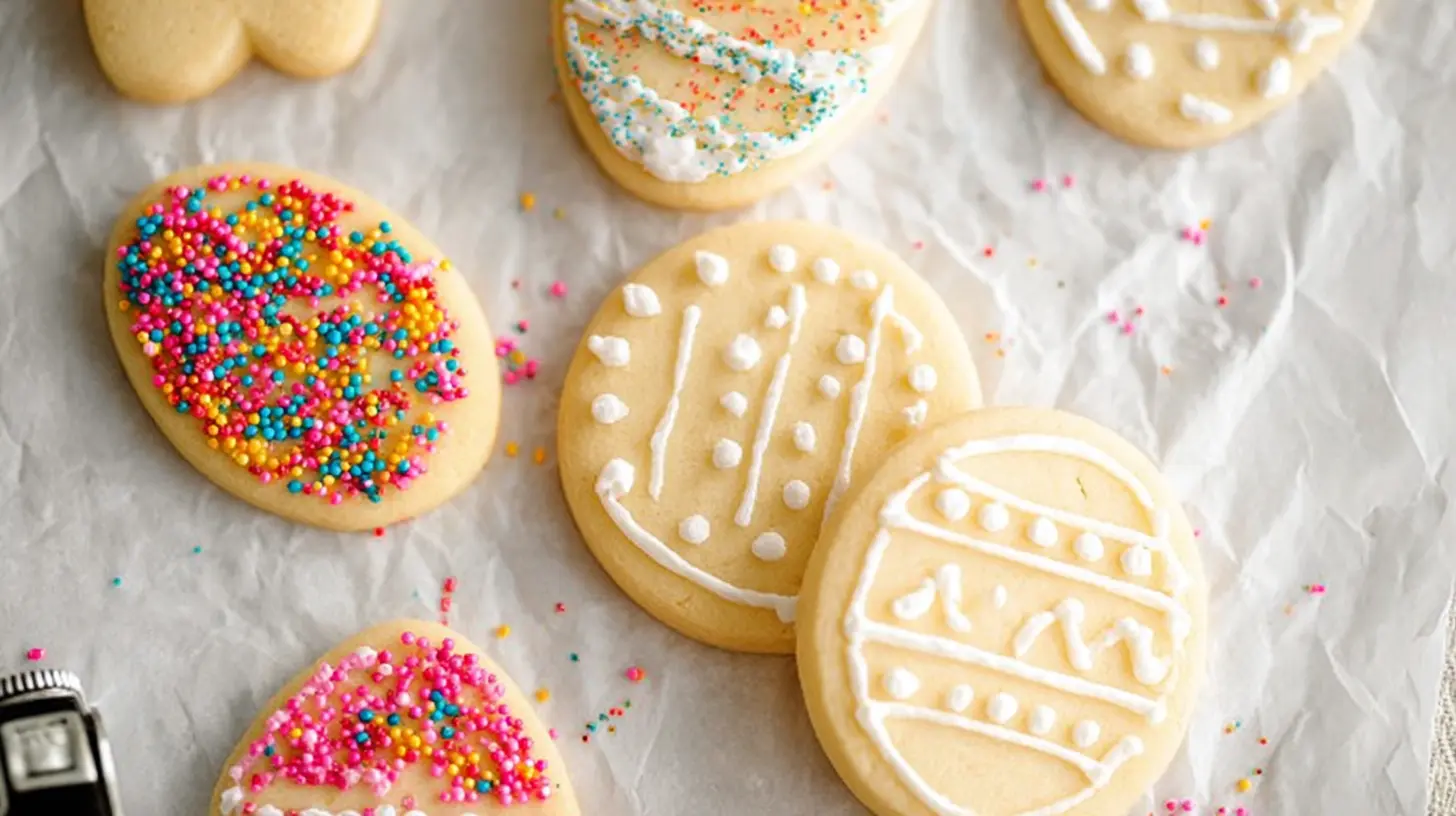
These Delightful Sugar Cookies are fantastic on their own, especially with a cup of coffee or tea. But don’t stop there! They’re a blank canvas for creativity. Once completely cool, you can decorate them with a simple glaze of powdered sugar and milk, colorful sprinkles, or even royal icing for a more elaborate touch. They are also wonderful served alongside a scoop of vanilla ice cream or as part of a dessert platter. For a truly indulgent experience, dip them in melted chocolate!
Keeping Leftovers Fresh
To keep your delightful sugar cookies at their best, store them in an airtight container at room temperature. They will stay fresh for up to 5-7 days. If you’ve decorated them with icing, make sure the icing is completely set before stacking to prevent sticking.
- Freezing Baked Cookies: Baked and cooled cookies can be frozen for up to 3 months. Place them in a single layer on a baking sheet to freeze solid, then transfer them to a freezer-safe bag or container. Thaw at room temperature before serving.
- Freezing Dough: You can also freeze the raw dough. Wrap the dough ball tightly in plastic wrap, then place it in a freezer-safe bag for up to 3 months. Thaw in the refrigerator overnight before rolling and baking as directed.
Helpful Cooking Tips
- Don’t Overmix: This is probably the most crucial tip for tender sugar cookies. Mix the flour in just until it’s combined. Overmixing develops gluten, leading to tougher cookies.
- Properly Softened Butter: Take your butter out of the fridge about an hour before you start baking. It should be pliable enough to press an indentation with your finger but not melted or greasy.
- Chill Your Dough: While not strictly mandatory if you live in a cool climate, chilling the dough for 15-30 minutes makes it much easier to roll and cut, and helps the cookies retain their shape better in the oven.
- Even Thickness: Try to roll your dough to a consistent ¼-inch thickness. This ensures all your cookies bake evenly and prevents some from burning while others are undercooked.
- Parchment Paper is Your Friend: It prevents sticking, makes cleanup a breeze, and ensures an even bake.
Creative Twists
While these three-ingredient cookies are perfect as they are, there’s always room for a little creativity:
- A Hint of Vanilla: Add ½ teaspoon of vanilla extract with the butter and sugar for an extra layer of classic flavor.
- Citrus Zest: For a brighter cookie, add 1-2 teaspoons of finely grated lemon, orange, or lime zest to the butter and sugar mixture.
- Sprinkle Fun: Before baking, sprinkle the cut-out cookies with colorful sprinkles or coarse sugar for extra sparkle and crunch.
- Spice It Up: A pinch of cinnamon, nutmeg, or even a tiny bit of ground cardamom can add warmth and intrigue.
- Gluten-Free Option: While I haven’t tested this exact recipe with gluten-free flour, you can often substitute a 1:1 gluten-free baking blend (that includes xanthan gum) for the all-purpose flour. Results may vary slightly.
Common Questions
How do I know when my sugar cookies are done baking?
The cookies are done when their edges are lightly golden brown and the centers look set. They should still be slightly soft in the middle when you gently touch them. They will continue to firm up as they cool on the baking sheet.Can I use margarine instead of butter?
While you technically can use margarine, butter yields a superior flavor and texture. Margarine often contains more water, which can affect the spread and crispness of the cookies. For the best “delightful” experience, stick with real butter.Why did my cookies spread too much?
There are a few common culprits. Your butter might have been too soft (or even slightly melted), you might not have chilled your dough, or your oven temperature could be a little off (too low). Ensuring the dough is cool and the butter is properly softened, not greasy, will help immensely. Also, make sure not to over-flour your work surface when rolling, as excess flour can change the dough’s consistency.
Classic Delightful Sugar Cookies
Equipment
- large bowl
- stand mixer
- hand mixer
- whisk
- plastic wrap
- baking sheets
- parchment paper
- cookie cutters
- wire rack
- piping bag
- small round tip
- squeeze bottles
- toothpick
Ingredients
For the Cookies:
- 1 cup unsalted butter, softened
- 1 ½ cups granulated sugar
- 2 large eggs
- 1 teaspoon vanilla extract
- 3 cups all-purpose flour
- 1 teaspoon baking powder
- ½ teaspoon salt
For the Royal Icing (Decorating):
- 4 cups powdered sugar, sifted
- 3 tablespoons meringue powder
- ½ teaspoon vanilla extract (clear, if you want pure white icing)
- 6-8 tablespoons warm water
- Gel food coloring various colors
Instructions
For the Delightful Sugar Cookies:
- Cream together the softened butter and granulated sugar on medium speed until light and fluffy, about 2-3 minutes.
- Beat in the eggs one at a time, mixing well after each addition, then stir in the vanilla extract.
- In a separate bowl, whisk together the flour, baking powder, and salt.
- Gradually add the dry ingredients to the wet ingredients on low speed, mixing until just combined without overmixing.
- Divide the dough in half, wrap each half in plastic wrap, and refrigerate for at least 30 minutes to prevent spreading.
- Preheat your oven to 375°F (190°C) and line baking sheets with parchment paper.
- On a lightly floured surface, roll one portion of chilled dough to about ¼-inch thickness and cut out shapes with cookie cutters.
- Transfer cut-out cookies to prepared baking sheets, leaving 1 inch between them, and bake for 7-10 minutes or until edges are lightly golden.
- Cool cookies on baking sheets for 5 minutes, then transfer to a wire rack to cool completely before decorating.
For the Royal Icing & Decorating:
- In a large bowl, whisk together sifted powdered sugar and meringue powder, then slowly add vanilla extract and warm water, mixing until a thick, smooth consistency is achieved.
- Divide the royal icing into separate bowls and add gel food coloring sparingly to achieve desired shades.
- Achieve piping consistency (toothpaste-like) by adjusting with water or powdered sugar, and flooding consistency (honey-like) by adding small amounts of water until it flows smoothly.
- Outline the edge of each cookie with piping consistency icing using a small round tip, and let it dry for 10-15 minutes to create a dam.
- Fill in the outlined area with flooding consistency icing using squeeze bottles, spreading to the edges and popping air bubbles with a toothpick.
- Create wet-on-wet designs by dropping contrasting flood icing onto wet base icing and dragging a toothpick through to create patterns.
- For intricate designs or layers, allow the first layer of flood icing to dry completely (4-6 hours or overnight) before adding details with piping consistency icing.
- Once all icing layers are completely dry, add edible glitter, sprinkles, or dragees, securing larger embellishments with a dab of royal icing.
- Allow decorated cookies to dry completely on a wire rack for 8-12 hours or overnight until the royal icing is fully hardened to prevent smudging and allow stacking.