When I first started cooking, salmon felt intimidating. I’d end up with dry, uninspired fillets, far from the perfectly flaky, restaurant-quality fish I craved. Then came the revelation: a cast iron pan. There’s something magical about how it sears, creating that irresistible crispy skin while keeping the inside tender and juicy. This recipe isn’t just about cooking salmon; it’s about transforming a simple ingredient into a quick, healthy, and utterly delicious meal using just seven straightforward steps. If you’re looking to elevate your weeknight dinner game without spending hours in the kitchen, you’ve come to the right place.
Why Cook This at Home?
There are countless reasons why searing salmon in a cast iron pan should become a staple in your kitchen. First off, it’s incredibly quick – we’re talking about a complete protein-packed meal on the table in under 20 minutes, including prep! This makes it ideal for those busy weeknights when you want something satisfying and healthy without resorting to takeout.
Beyond speed, the cast iron pan is a game-changer for achieving that coveted crispy skin. No other pan quite replicates the even, high heat that results in such a beautiful, golden crust, while simultaneously locking in moisture to keep the flesh wonderfully tender. It’s also a fantastic budget-friendly option compared to dining out, allowing you to enjoy gourmet-level fish from the comfort of your home. Plus, salmon is packed with Omega-3 fatty acids, making this a delicious way to boost your health.
> “I used to be so scared to cook fish, but this cast iron salmon recipe changed everything! It’s so simple, and the salmon comes out perfect every time – crispy skin and flaky inside. My family asks for it constantly!” – A happy home cook
Step-by-Step Overview
Getting perfectly seared salmon is all about technique, and this recipe breaks it down into a super manageable process. You’ll start by prepping your salmon and bringing it to room temperature for even cooking. Then, it’s all about seasoning generously to build flavor, getting that cast iron pan screaming hot, and searing the salmon skin-side down first to achieve maximum crispiness. A quick flip and a few more minutes, and you’ll have a beautifully cooked fillet ready to enjoy. It really is that simple, and I’ll walk you through each key moment.
Key Ingredients
To make this delightful Cast Iron Pan Seared Salmon, you won’t need a long list of obscure items. In fact, its beauty lies in its simplicity!
- Salmon Fillets: Opt for skin-on fillets, about 6 oz each, and around 1-inch thick. Wild-caught or sustainably farmed are often excellent choices. The skin is essential for that crispy texture we’re aiming for.
- Olive Oil (or high-heat oil like avocado oil): Just enough to coat the pan and help with seasoning.
- Salt & Freshly Ground Black Pepper: These are your primary flavor builders. Don’t be shy!
- Lemon Wedges: For serving, a squeeze of fresh lemon brightens up the rich flavor of the salmon beautifully.
- Optional Seasonings: You can get creative here! A sprinkle of garlic powder, onion powder, paprika, or even a dash of dried dill or a pre-made seafood seasoning blend can add another layer of flavor.
Directions to Follow
Let’s get that perfectly seared salmon on your plate! Follow these steps closely for the best results:
- Prep the Salmon: Take your salmon fillets out of the refrigerator about 15-20 minutes before you plan to cook. Pat them thoroughly dry on all sides with paper towels. This is crucial for crispy skin – moisture is the enemy of sear!
- Season Generously: Lightly brush or drizzle a tiny bit of olive oil over both sides of each salmon fillet. Season the skin side liberally with salt and black pepper. Then, season the flesh side with salt and pepper. If using, sprinkle on any additional seasonings now.
- Heat the Cast Iron: Place your cast iron skillet over medium-high heat. Let it preheat for 3-5 minutes until it’s smoking slightly and a drop of water flicked onto the surface evaporates instantly. This high heat is key for a good sear.
- Add Oil: Once the pan is hot, add about 1-2 tablespoons of olive oil. Swirl it around to coat the bottom of the pan evenly. The oil should shimmer but not smoke excessively right away.
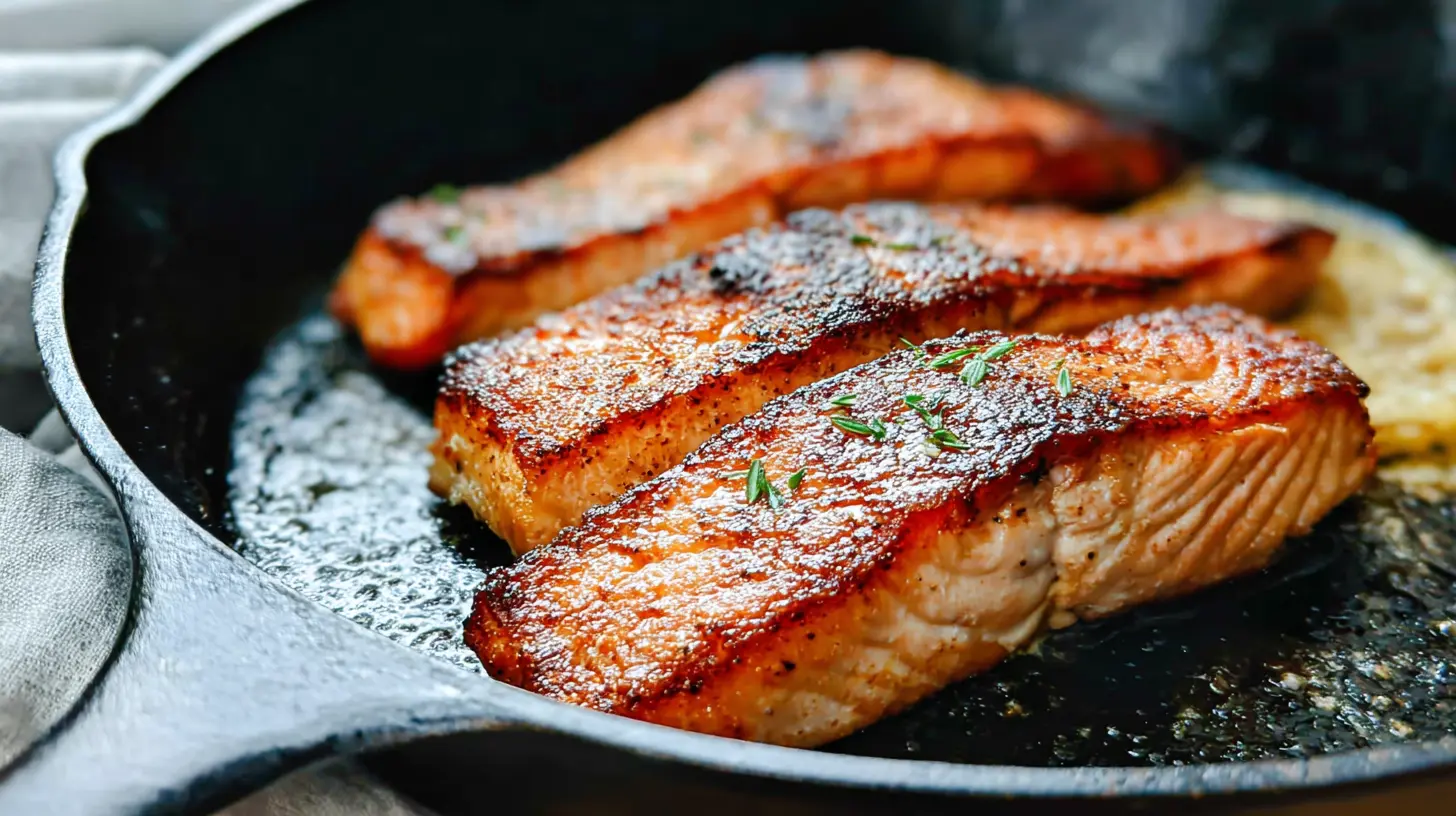
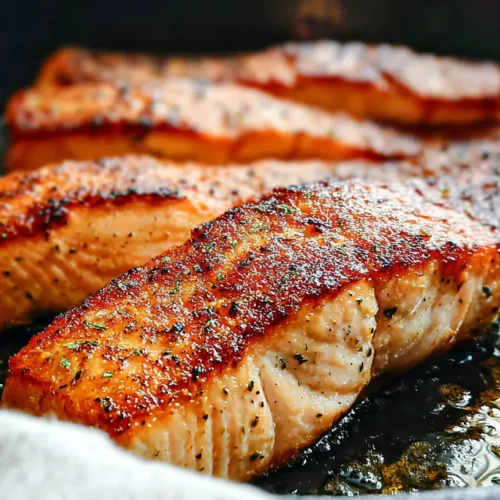
- Sear Skin-Side Down: Carefully place the salmon fillets, skin-side down, into the hot pan. Press down gently on each fillet with a spatula for the first 30 seconds to ensure full contact with the pan and prevent the skin from buckling.
- Cook Skin-Side: Let the salmon cook undisturbed for about 4-6 minutes, or until the skin is deeply golden brown and crispy, and the flesh has turned opaque about two-thirds of the way up the sides.
- Flip and Finish: Carefully flip the salmon fillets. Cook for another 2-4 minutes on the flesh side, depending on your desired doneness. For medium-rare (flaky but still slightly translucent in the center), aim for an internal temperature of 125-130°F (52-54°C). For medium (fully opaque and flaky), 135-140°F (57-60°C).
- Rest and Serve: Remove the salmon from the pan and let it rest on a plate for 2-3 minutes. This allows the juices to redistribute, ensuring a more tender and flavorful result. Serve immediately with fresh lemon wedges.
Best Ways to Enjoy It
Cast Iron Pan Seared Salmon is incredibly versatile and pairs well with a variety of sides, making it easy to create a balanced meal. For a quick weeknight dinner, I often serve it alongside a simple green salad with a light vinaigrette or some steamed asparagus. If you’re looking for something a bit more substantial, roasted broccoli or sautéed spinach are fantastic choices.
For a heartier meal, consider serving it with a bed of fluffy quinoa or brown rice. If you’re feeling a little fancy, a creamy risotto or some garlicky mashed potatoes can elevate the dish. Don’t forget that squeeze of fresh lemon juice at the end – it truly brightens up all the flavors! For presentation, a sprinkle of fresh chopped parsley or dill adds a pop of color and herbaceous freshness.
How to Store & Freeze
Proper storage is key to enjoying your leftover salmon safely and deliciously. Once cooked, allow any leftover salmon to cool completely to room temperature (no more than 2 hours).
- Refrigeration: Store the salmon in an airtight container in the refrigerator for up to 3-4 days. This applies to both cooked fillets and any components of a dish containing the salmon.
- Reheating: To reheat, I recommend using a conventional oven or even a toaster oven at a low temperature (around 275-300°F or 135-150°C) for about 10-15 minutes, or until just warmed through. This helps prevent it from drying out. You can also gently warm it in a non-stick skillet over low heat. Microwaving can often lead to dry, rubbery salmon, so it’s best avoided if possible.
- Freezing: Freezing cooked salmon isn’t ideal for texture, especially with pan-seared fish where the crispy skin is a highlight. While technically safe to freeze cooked salmon for up to 2-3 months in an airtight, freezer-safe container, reheating will likely result in a softer texture and less crisp skin. It’s best enjoyed fresh or from refrigeration.
Helpful Cooking Tips
Achieving that perfectly seared salmon comes down to a few key techniques. Here are my top tips to ensure success every time:
- Dry, Dry, Dry: I cannot stress this enough – pat the salmon completely dry with paper towels before seasoning. Any moisture on the skin will steam instead of sear, preventing that lovely crispness.
- Temperature Matters: Let your salmon come to room temperature for 15-20 minutes before cooking. This ensures more even cooking throughout the fillet. If the fish is too cold, the outside will cook faster than the inside, leading to uneven results.
- Hot Pan, Cold Oil: Get your cast iron pan screaming hot before adding the oil. Then add the oil and immediately add the salmon. A super hot pan creates an instant sear that locks in moisture and develops that fantastic crust.
- Don’t Overcrowd: Cook salmon in batches if necessary. Overcrowding the pan will lower the temperature and lead to steaming rather than searing.
- Resist the Urge to Peek: Once the salmon is skin-side down, let it cook undisturbed. Don’t lift it, don’t nudge it! This allows the crust to form properly. You’ll know it’s ready to flip when the skin easily releases from the pan when gently nudged with a spatula.
- Check for Doneness: The easiest way to tell if salmon is cooked is by gently pressing on the top with a fork or your finger. It should flake easily. For precision, an instant-read thermometer inserted into the thickest part should register your desired temperature (125-140°F, depending on preference).
Creative Twists
While this classic Cast Iron Pan Seared Salmon is delicious on its own, there are plenty of ways to add your own creative spin:
- Herb Butter Finish: After flipping, drop a tablespoon of butter, a smashed garlic clove, and a sprig of fresh thyme or rosemary into the pan. Baste the salmon with the melting herb butter during the last couple of minutes of cooking for an extra layer of flavor.
- Spicy Kick: Sprinkle a pinch of cayenne pepper or a dash of your favorite chili powder with the salt and pepper for a nice warm heat.
- Citrus & Herb Infusion: Instead of just lemon, consider adding a sprinkle of lemon zest, fresh dill, or chopped parsley to your seasoning mix. You can also finish with a quick squeeze of orange or lime juice.
- Mediterranean Style: Season with dried oregano, a pinch of cumin, and serve with a dollop of tzatziki or a fresh tomato and cucumber salad.
- Asian Inspired: Before searing, brush the salmon with a mixture of soy sauce, a touch of honey or maple syrup, fresh grated ginger, and a dash of sesame oil. Be mindful of the sugar content in soy/honey as it can burn quickly.
Common Questions
How do I get truly crispy skin on my salmon?
The secret to truly crispy skin is threefold: extremely dry salmon skin, a screaming hot cast iron pan, and sufficient oil. Pat the salmon skin relentlessly with paper towels until it’s completely dry. Preheat your cast iron pan over medium-high heat until it’s very hot (a drop of water should evaporate instantly), then add your oil. Place the salmon skin-side down and press gently for the first 30 seconds to ensure full contact. Don’t touch it for 4-6 minutes – let that crust develop!
My salmon sticks to the pan – what am I doing wrong?
If your salmon is sticking, it’s usually because the pan wasn’t hot enough, or you added the salmon before the oil was sufficiently heated. A properly seasoned and hot cast iron pan, combined with enough oil, should create a non-stick surface. Also, avoid trying to flip the fish too early. If the skin isn’t beautiful and crispy, it’s not ready to release from the pan. Give it another minute or two.
What’s the best way to tell if my salmon is cooked through?
The easiest visual cue is when the salmon flakes easily if you gently press it with a fork or your finger. The flesh should turn opaque throughout. For precise cooking, an instant-read thermometer inserted into the thickest part of the fillet should register between 125-130°F (52-54°C) for medium-rare, or 135-140°F (57-60°C) for medium. Remember, it will continue to cook slightly as it rests.
Can I use skinless salmon for this recipe?
While you can sear skinless salmon in a cast iron pan, you’ll miss out on that delightful crispy skin texture which is a highlight of this method. If using skinless, ensure it’s very dry and reduce the initial cooking time slightly on one side, focusing on even browning.
Crispy Skin Cast Iron Salmon with Lemon Herb Butter
Equipment
- Cast Iron Skillet
- Paper Towels
- Spatula
- Spoon
Ingredients
Main Ingredients
- 2 (6-ounce) skin-on salmon fillets about 1-inch thick (wild-caught preferred)
- 1-2 tablespoons olive oil
- 2 tablespoons unsalted butter
- 2 cloves garlic minced (or 1 teaspoon garlic powder)
- 1 tablespoon fresh herbs (dill, parsley, or thyme) (or ½ teaspoon dried herbs)
- ½ lemon for juice and wedges for serving
- Salt to taste
- freshly ground black pepper to taste
- Optional Flavor Booster e.g., ½ tsp smoked paprika, 1 tsp honey/maple syrup, ½ tsp Dijon mustard, 1 tsp soy sauce, ¼ tsp chili flakes, or ½ tsp grated fresh ginger
Instructions
Instructions
- Thoroughly pat the salmon fillets dry with paper towels and season liberally on both sides with salt and freshly ground black pepper.
- Heat a cast iron skillet over medium-high heat, then add olive oil and heat until shimmering.
- Place salmon skin-side down, pressing gently for 10-15 seconds to ensure even contact and prevent curling; sear for 4-6 minutes until the skin is crisp and deep golden brown.
- Flip the salmon, then immediately add butter, minced garlic, herbs (and optional flavor boosters); once butter melts, baste the salmon with the mixture for 1-2 minutes.
- Continue cooking for 2-4 minutes more, or until the salmon reaches your desired doneness (145°F/63°C), adding a squeeze of fresh lemon juice in the last minute.
- Remove the salmon from the pan and let it rest on a plate for 2-3 minutes before serving with lemon wedges.